The XBee to phone/tablet communication use case involves providing a user-friendly interface to manage and control devices or hardware that may not have a built-in display. The XBee 3 BLU device enables this hardware with Bluetooth communication, allowing other devices such as smartphones or tablets to communicate with it wirelessly. This is particularly useful for:
-
Device provisioning: Provisioning devices with a mobile app via Bluetooth to configure network settings, IDs, and other operational parameters, ensuring seamless integration into a larger system.
-
Industrial control systems: Where operators can monitor and control machinery or sensors remotely.
-
IoT device management: Providing a centralized control point for various connected devices in a smart home or office.
Communication model
The XBee to phone/tablet communication use case utilizes a connection-oriented communication model where a device acts as a GATT server (exposing services and characteristics) and another as GATT client, which interacts with those elements to communicate with the server. This model requires a direct and sustained connection between the client BLE device and the phone or tablet device running a compatible application. This setup ensures reliable and continuous bidirectional data exchange.
In this model, the phone or tablet device (GATT server) defines various services, each containing multiple characteristics. These characteristics represent individual pieces of data that can be read or written by the client. The GATT client connects with the server and interacts with these characteristics to retrieve data or send commands.
Key characteristics:
-
Connection requirement: Direct connection is necessary between the client device and the phone or tablet device.
-
Data transmission: Bidirectional; both the client device and the phone or tablet device can send and receive data through the defined GATT characteristics.
-
Advantages: Ensures reliable and continuous data flow, suitable for applications needing stable and responsive communication channels.
Remote HMI demo
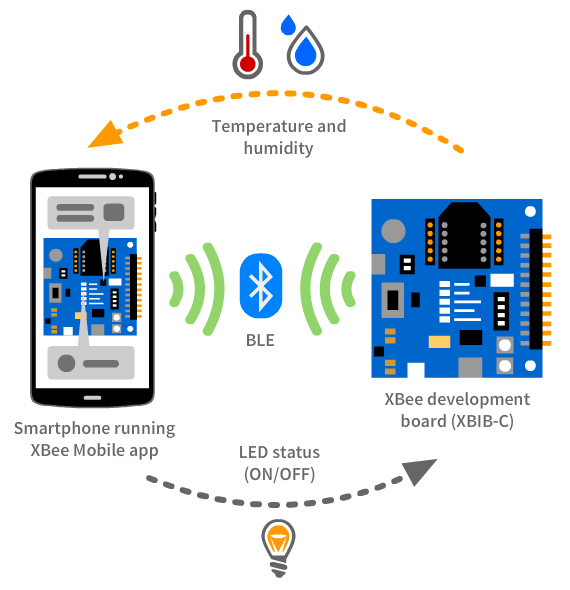
Digi has developed a demo called Remote Human-Machine-Interface (HMI) that illustrates how XBee 3 BLU devices can be used to extend the capabilities of devices lacking a native HMI. By using a smartphone app, users can interact wirelessly with the XBIB-C development board to read temperature and humidity values from its embedded I2C sensor and manage the status of the User LED, simulating how industrial machinery or consumer electronics can be controlled. This setup can be adapted for real-world applications where remote monitoring and control are essential.
The Remote HMI demo involves an XBee 3 BLU device configured with a specific setup (applied using the Quick Setup feature of XBee Studio) and the XBee Mobile application running on a smartphone.

-
The XBee 3 BLU device runs a MicroPython application that listens for commands sent from the XBee Mobile app, allowing you to perform the following actions:
-
Read the temperature and humidity values from the I2C sensor of the XBIB-C board. Values are reported by the MicroPython application every 5 seconds.
-
Change the status of the User LED on the board.
-
-
The XBee Mobile app connects with the XBee 3 BLU device and sends the proper commands to the XBee 3 BLU device to read the temperature and humidity values and toggle the status of the LED.
The XBee Mobile app includes a new built-in feature called Get Started that centralizes the smartphone functionality for the different demos of the XBee 3 BLU use cases. Since mobile development can be a complex part of the implementation process, Digi provides sample interfaces in this section of the app so you can test the demos.
Requirements
The Remote HMI demo requires the following components and software:
-
1 XBee 3 BLU device.
-
1 XBIB-C development board.
-
1 U.FL antenna.
-
1 test cable.
-
A computer with the XBee Studio application installed.
-
You can download it here.
-
-
A smartphone (iOS or Android) with the XBee Mobile application installed. You can download it from:
-
Android: Google Play.
-
iOS: Apple Store.
-
You can scan the following QR to download the application from the corresponding market:

-
Set up the hardware
Before testing the demo, ensure the hardware is set up correctly:
-
XBIB-C development board requires a slight modification to enable the XBee 3 BLU device to access the I2C sensor:
-
Connect one end of the test cable to pin 24 of the Breakout connector within the XBIB-C development board and the other end to pin 36:

-
-
Attach the XBee 3 BLU device to the XBee socket of the XBIB-C development board.
-
In case your device requires an antenna, connect the antenna to the antenna connector of the XBee 3 BLU device:
-
Align the U.FL antenna with the U.FL female counterpart on the device. Then, press down until you hear a click.
-
-
Connect the XBIB-C development board to your computer using the USB cable.
-
Verify the RSSI (orange LED) is solid.
Apply the Remote HMI Quick Setup
Follow these steps to configure your XBee 3 BLU device to apply the Remote HMI Quick setup:
-
Open XBee Studio and wait for your XBee 3 BLU device to be automatically discovered.
-
Access the Quick Setup wizard from the left navigation menu (lightning icon, second option in the list). The wizard page displays.
-
Select the Remote HMI Quick Setup from the list of available quick setups.
-
Click Start. The tab associated with the selected quick setup displays.
The interactive help may appear if this is the first time you are executing a quick setup. In that case, uncheck the Always show interactive help option and then click anywhere in the screen to close the interactive help. -
The Quick Setup tab displays two controls: a list of devices and a role box titled Remote HMI. Drag and drop the XBee 3 BLU device from the list to the Remote HMI role box.
-
Click Next to continue. The Summary page displays.
-
Verify that your XBee 3 BLU device will be configured as Remote HMI and click Next to continue. The Flash page appears.
-
The Flash page displays a table with the configuration progress for the XBee 3 BLU device selected in the Quick Setup. When the device is fully configured, the Test page displays.
-
Click Evaluate to start testing the Quick Setup. The XBee 3 BLU device resets and the MicroPython Terminal tab for the XBee 3 BLU device displays.
The Test page contains a set of instructions to evaluate the Quick Setup, you can skip them as they are explained in this documentation too.
Test the Remote HMI demo
Once the Quick Setup is applied to the XBee 3 BLU device, use your smartphone to test the demo:
-
Start the XBee Mobile application on your smartphone. The Home page of the application displays.
-
Tap the Get Started option. The list of Get Started options displays.
-
Select the Remote HMI option. The Remote HMI demo overview page displays.
-
Tap the Select Device option from the second step. The Device List page displays.
-
Wait until your XBee 3 BLU device appears in the list, then select it. The Password dialog appears.
-
Enter 1234 in the password field and tap Connect.
-
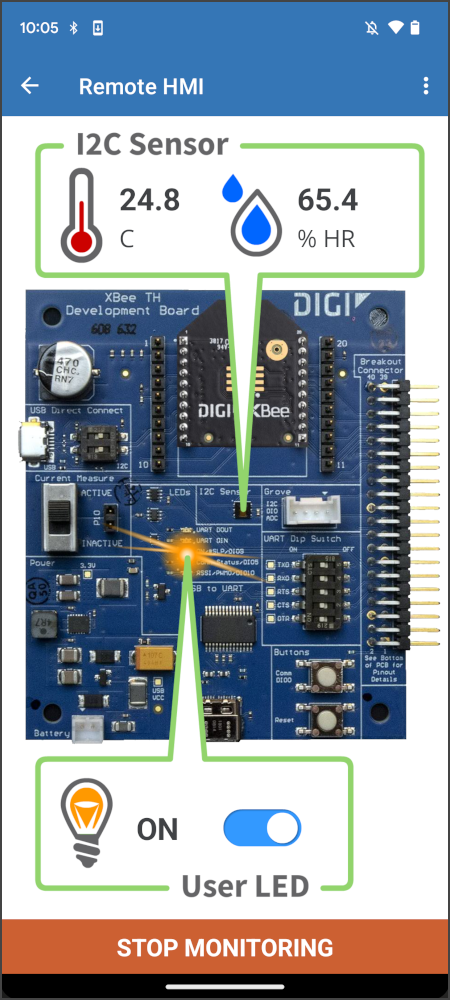
Wait for the app to connect with the device. When connected, the Remote HMI demo page displays.
-
The page shows a picture of the XBIB-C development board and two boxes.
-
The first box contains two icons for temperature and humidity values and points to the I2C humidity and temperature sensor on the board.
-
The second box contains an icon for the LED with a switch and points to the User LED of the board.
-
-
-
Tap the START MONITORING button to start refreshing the temperature and humidity values. Values update every 5 seconds.
-
Tap the LED switch to turn on the User LED on the XBIB-C board. Tap the switch again to turn it off.

| In the MicroPython Terminal of the XBee 3 BLU device in XBee Studio, you can verify that the actions performed in the XBee Mobile app have been acknowledged by the MicroPython application running on the XBee 3 BLU device. Verify also that every 5 seconds it displays the humidity and temperature values being sent to the smartphone. |
Recap
In this chapter, you have successfully implemented a new Remote Human-Machine Interface using a XBee 3 BLU device for the wireless communication and a smartphone for the display. It demonstrates how devices can be remotely monitored and controlled.
Key achievements
As part of this guide, you have:
-
Configured one XBee 3 BLU device to act as a GATT server, being the Bluetooth and HMI enabler for the XBIB-C.
-
Used a smartphone as GATT client, connecting to the GATT server and acting as the remote display for the XBee 3 BLU device.
-
Demonstrated remote monitoring and control of the XBee 3 BLU through the smartphone:
-
Read sensor data.
-
Manage the status of its User LED.
-
Demo components review
Here is a brief explanation of the role of each component that took part in the Remote HMI demo that covers the functionality of the XBee to phone/tablet communication use case:
| Component | Role | Software used | Technology | Tasks |
|---|---|---|---|---|
XBee 3 BLU device |
GATT server |
Embedded MicroPython app |
|
|
Smartphone |
GATT client |
XBee Mobile app |
|
|


