The Beacon Scanner use case involves scanning for Bluetooth Low Energy (BLE) beacons in the vicinity to gather information or trigger specific actions based on beacon proximity or content.
| BLE beacons are low-energy hardware transmitters that broadcast short-range wireless packets at regular intervals using Bluetooth Low Energy (BLE) technology. These packets typically contain unique identifiers and can also include additional data payloads. BLE beacons are widely used for proximity detection and location-based services, enabling devices to recognize when they are near a specific beacon and respond accordingly. |
Devices with BLE support can broadcast their presence using advertising packets, which can include custom data relevant to specific applications. This capability enables a wide range of scenarios, from simple presence detection to more complex interactions such as asset tracking or proximity-based notifications.
This use case is particularly useful for:
-
Retail marketing: Engaging customers with personalized promotions or information as they enter specific areas within a store.
-
Asset tracking: Monitoring the presence and location of assets equipped with beacons within a facility.
-
Event management: Managing attendee experiences by providing location-based services such as navigation assistance or information at large venues.
-
Broadcasting custom data: Using beacons to transmit specific data such as telemetry, promotional content, or user-defined information, which can be useful in a variety of contexts.
In this use case, the device acts as a scanner, continuously monitoring for beacon advertisements and reacting to the detected signals.
Communication model
The Beacon Scanner use case utilizes a non-connection-oriented communication model. This model does not require a direct connection between devices; instead, it relies on the advertisement and scanning mechanism inherent to BLE technology.
In this use case, the scanner device continuously monitors for BLE advertisements broadcasted by nearby devices. This model is widely used in BLE applications, especially for use cases involving proximity detection and passive data collection.
Key characteristics:
-
Connection requirement: No direct connection is needed between the scanner device and the advertising one.
-
Data transmission: Unidirectional; the advertiser device broadcasts data, and other BLE devices can passively receive it.
-
Advantages: Low power consumption and simplified interaction since no pairing or connection setup is required.
XBee Beacon Scan demo
Digi’s XBee Beacon Scan demo demonstrates how XBee 3 BLU devices can be used to detect custom BLE beacons and process the received data. This demo showcases the ability to scan and handle custom beacon advertisements, simulating environments where real-time location or contextual information is needed based on beacon proximity.
The XBee Beacon Scan demo involves an XBee 3 BLU device configured with a specific setup (applied using the Quick Setup feature of XBee Studio) and the XBee Mobile application running on a smartphone.
-
A smartphone running the XBee Mobile App acts as the BLE beacon transmitter, broadcasting text packets that can be customized in the application itself.
The XBee Mobile app includes a new built-in feature called Get Started that centralizes the smartphone functionality for the different demos of the XBee 3 BLU use cases. Since mobile development can be a complex part of the implementation process, Digi provides sample interfaces in this section of the app so you can test the demos. -
The XBee 3 BLU device runs a MicroPython application that scans for custom BLE beacons. When the XBee 3 BLU device enters the range of the smartphone, the BLE data packets advertised by the smartphone are detected by the device and printed through its serial interface.
This setup simulates a real-world scenario where a scanning device needs to detect and interpret custom beacons, enabling applications such as indoor navigation, targeted marketing, or asset tracking.
Requirements
The XBee Beacon Scan demo requires the following components and software:
-
1 XBee 3 BLU device.
-
1 XBIB-C development board.
-
1 U.FL antenna.
-
A computer with the XBee Studio application installed.
-
You can download it here.
-
-
A smartphone (iOS or Android) with the XBee Mobile application installed. You can download it from:
-
Android: Google Play.
-
iOS: Apple Store.
-
You can scan the following QR to download the application from the corresponding market:

-
Set up the hardware
Before testing the demo, ensure the hardware is set up correctly:
-
Attach the XBee 3 BLU device to the XBee socket of the XBIB-C development board.
-
In case your device requires an antenna, connect the antenna to the antenna connector of the XBee 3 BLU device:
-
Align the U.FL antenna with the U.FL female counterpart on the device. Then, press down until you hear a click.
-
-
Connect the XBIB-C development board to your computer using the USB cable.
-
Verify the RSSI (orange LED) is solid.
Apply the XBee Beacon Scan Quick Setup
Follow these steps to to apply the XBee Beacon Scan Quick setup to your XBee 3 BLU device:
-
Open XBee Studio and wait for your XBee 3 BLU device to be automatically discovered.
-
Access the Quick Setup wizard from the left navigation menu (lightning icon, second option in the list). The wizard page displays.
-
Select the XBee Beacon Scan Quick Setup from the list of available quick setups.
-
Click Start. The tab associated with the selected quick setup displays.
The interactive help may appear if this is the first time you are executing a quick setup. In that case, uncheck the Always show interactive help option and then click anywhere in the screen to close the interactive help. -
The Quick Setup tab displays two controls: a list of devices and a role box titled Scanning device. Drag and drop the XBee 3 BLU device from the list to the Scanning device role box.
-
Click Next to continue. The Summary page displays.
-
Verify that your XBee 3 BLU device will be configured as Scanning device and click Next to continue. The Flash page appears.
-
The Flash page displays a table with the configuration progress for the XBee 3 BLU device selected in the Quick Setup. When the device is fully configured, the Test page displays.
-
Click Evaluate to start testing the Quick Setup. The XBee 3 BLU device resets and the MicroPython Terminal tab for the XBee 3 BLU device displays.
The Test page contains a set of instructions to evaluate the Quick Setup, you can skip them as they are explained in this documentation too.
Test the XBee Beacon Scan demo
Once the Quick Setup is applied to the XBee 3 BLU device, you can test the beacon scanning functionality:
-
Start the XBee Mobile application on your smartphone. The Home page of the application displays.
-
Tap the Get Started option. The list of Get Started options displays.
-
Select the XBee Beacon Scan option. The XBee Beacon Scan demo overview page displays.
-
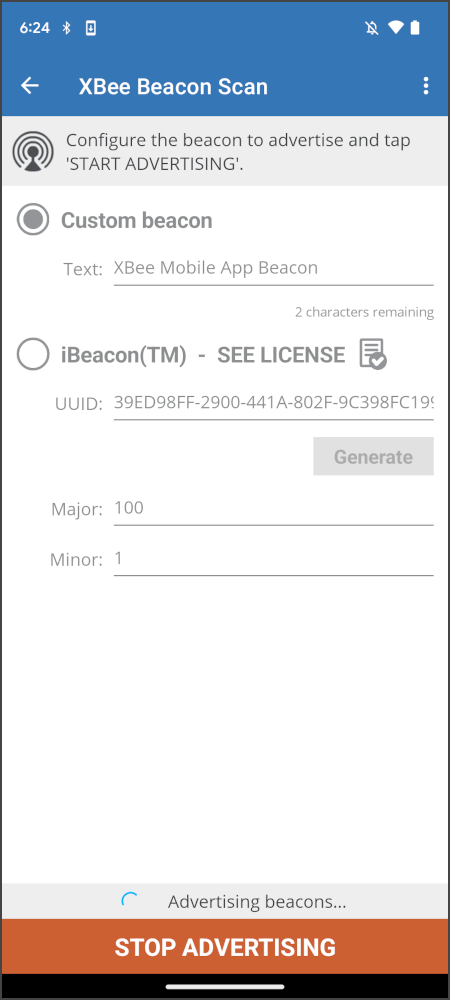
Tap the Configure frame option from the second step. The XBee Beacon Scan demo page displays.
-
The page allows you to configure the advertisement packet. In Android you can configure your device to be a custom BLE beacon or an iBeacon™, while in iOS it is only possible to behave as an iBeacon.
iBeacon™ is a trademark of Apple Inc. The iBeacon functionality included in the XBee Mobile app is provided solely for evaluation and demonstration purposes. This demo is not intended for commercial use and is not endorsed by or affiliated with Apple Inc.
By using this demonstration, you acknowledge that it is designed for educational and non-commercial purposes only. Any use of the iBeacon technology beyond evaluation and demonstration may require appropriate licensing from Apple Inc.
-
-
Configure the desired parameters for the advertisement packet.
-
Tap the START ADVERTISING button to start broadcasting the configured data.

-
In the MicroPython Terminal of the XBee Studio, monitor the output for the XBee 3 BLU device.
-
The device displays messages indicating it is scanning for BLE beacons:
- Scanning for beacons... -
After a few seconds, the MicroPython application finds the packet advertised by the smartphone and display information about it:
- Custom Digi beacon found: 02010219ffdb0258426565204d6f62696c652041707020426561636f6e
  - Source address: 58:4e:83:98:af:4a
  - Text: XBee Mobile App Beacon
  - RSSI: -45
OR:
- iBeacon found: 0201021aff4c000215b600dbfbc73e44ada6baaa8fce47444500640001c8
  - Source address: 4e:52:eb:cd:ad:da
  - UUID: b600dbfbc73e44ada6baaa8fce474445
  - Major: 100
  - Minor: 1
  - Tx power: 200
  - Approx. distance: 1.12 meters
  - RSSI: -57
-
Recap
In this chapter, you have successfully configured an XBee 3 BLU device to scan for custom BLE beacons, demonstrating how BLE devices can detect and interpret beacon advertisements. This capability is essential for various applications requiring proximity-based information and monitoring.
Key achievements
As part of this guide, you have:
-
Configured your XBee 3 BLU device to act as a scanner, continuously monitoring for nearby BLE beacon advertisements.
-
Generated custom advertisements and broadcasted them using the XBee Mobile application.
-
Detected and interpreted these custom beacon frames in your XBee 3 BLU device.
-
Displayed the information extracted from the beacon frames through the serial port of the XBee 3 BLU device.
Demo components review
Here is a brief explanation of the role of each component that took part in the XBee Beacon Scan demo that covers the functionality of the Beacon Scanner use case:
| Component | Role | Software used | Technology | Tasks |
|---|---|---|---|---|
XBee 3 BLU device |
Scanner device |
Embedded MicroPython app |
|
|
Smartphone |
Advertiser device |
XBee Mobile app |
|
|


