Changing the settings of your XBee 3 BLU allows you to customize the device’s operation according to your specific needs, such as adjusting network parameters, modifying communication settings, or optimizing power usage. This process is typically carried out when setting up a new module, troubleshooting issues, or adapting the device to meet new application requirements.
The firmware running in XBee devices contains a set of configurable parameters, which can be configured to change the behavior of the module or to perform any action related to it. These settings can be read and/or modified through AT Commands.
| To learn more about AT commands, see AT commands. |
You can configure your device using AT commands regardless of its operating mode and, depending on your use case or status in the development cycle, you can do it with any of the following approaches:
-
Serially:
-
Wirelessly:
-
Programmatically:
Using XBee Studio
XBee Studio allows you to configure all available settings on your XBee 3 BLU device connected to your PC through the serial interface, regardless of the device’s current configurations, including its operating mode.
Typically, you would use XBee Studio to configure your device during the early stages of development, such as when prototyping your solution, or in later stages, such as testing the setup before deployment.
To configure the XBee 3 BLU serially using XBee Studio:
-
Connect your device to a PC where XBee Studio is installed.
This section assumes that you know how to connect the XBee 3 BLU device to a PC. For more information on how to connect an XBee device to a PC, see the Step 2 - Set up the hardware page from the getting started section. -
Open XBee Studio.
-
Wait for your device to be discovered.
A module that’s never been configured should be discovered automatically, but if you have problems discovering your local device, see the Device discovery tools section of XBee Studio User Guide to learn how to do it manually. -
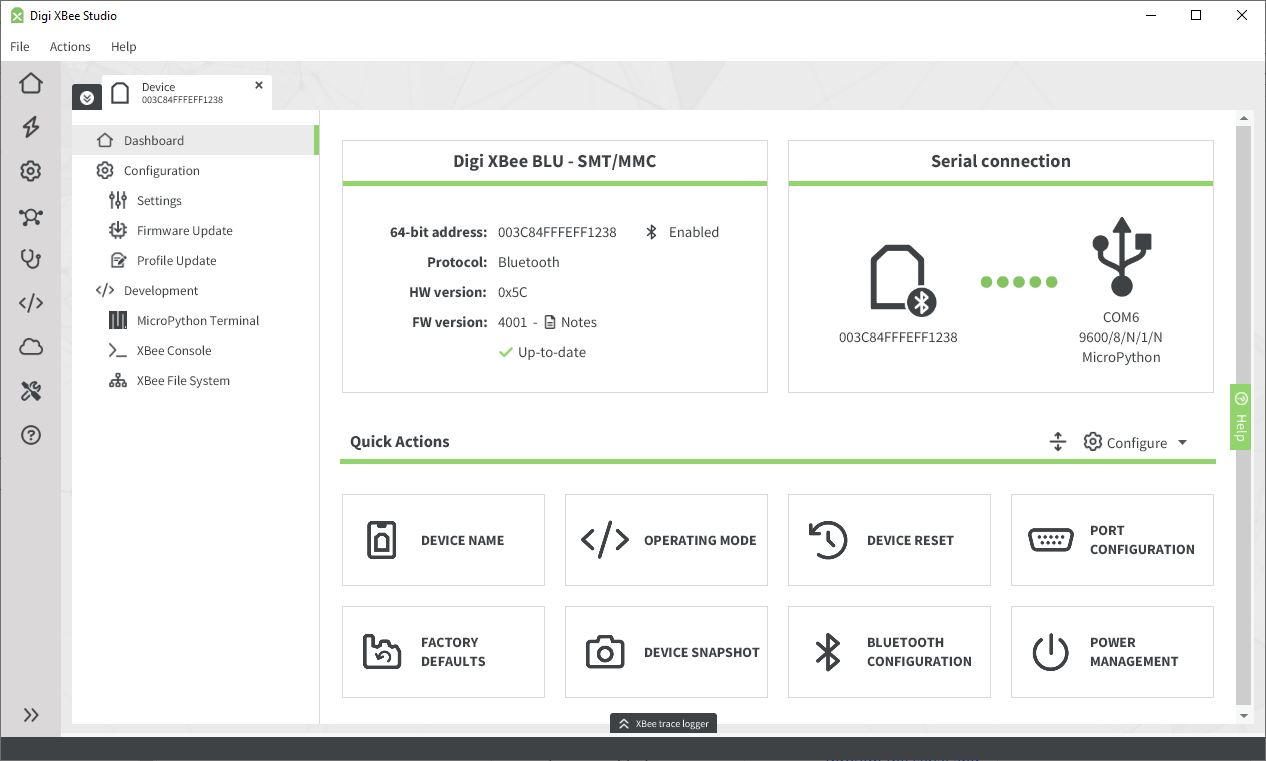
Click on the device. The Dashboard page appears. It contains the device information, connection interface and a list of quick actions.
-
Modify the device name:
You can modify settings using Quick Actions, which streamline the configuration process (only the most common tasks have associated Quick Actions), or manually through the Settings view. It’s generally recommended to use Quick Actions when available, as they ensure all necessary configurations are made for the desired functionality. The device name for your XBee 3 BLU is managed by the Node Identifier (
NI) setting. By changing this value, you can update the device’s name. This concept applies to all available configurations on the device, meaning you can modify any of them using AT commands.-
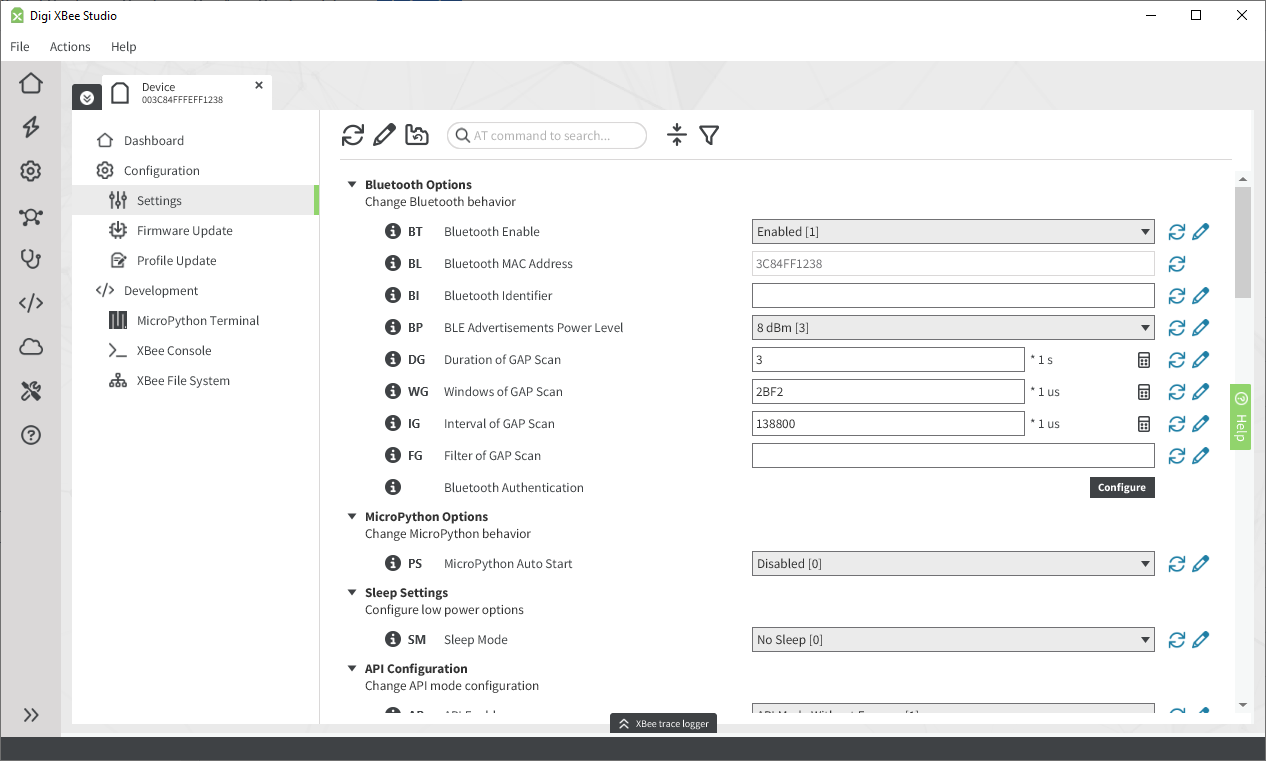
Click the Settings item in the sidebar of the tab, located within the Configuration section.

-
Search for the setting you want to update, in this case
NI. You can use the search box at the top toolbar within the device tab. -
Change the value of the setting. To do so, modify its corresponding input control (text field or combo box) with a valid value. You can find the valid range of values for a setting by clicking the Info button ('i' icon) on the left side of the setting you wish to modify.
-
Write the value to the non-volatile memory of your device by clicking the Write setting button (pencil icon) on the right side of the selected setting. This triggers a write operation on the device.
If you want to change multiple settings, you can write all of them at once and avoid multiple write operations. Do so by clicking the Write all device settings button on the toolbar located at the top of the settings page.
See the Settings section of the XBee Studio User Guide for more information. Quick Actions allow you to change groups of device settings to achieve complete functionality.

-
Find the quick action that corresponds to the settings you need to modify. For instance, to apply the same configuration as the previous example, adjust the
NIsetting, which represents the Device Name. -
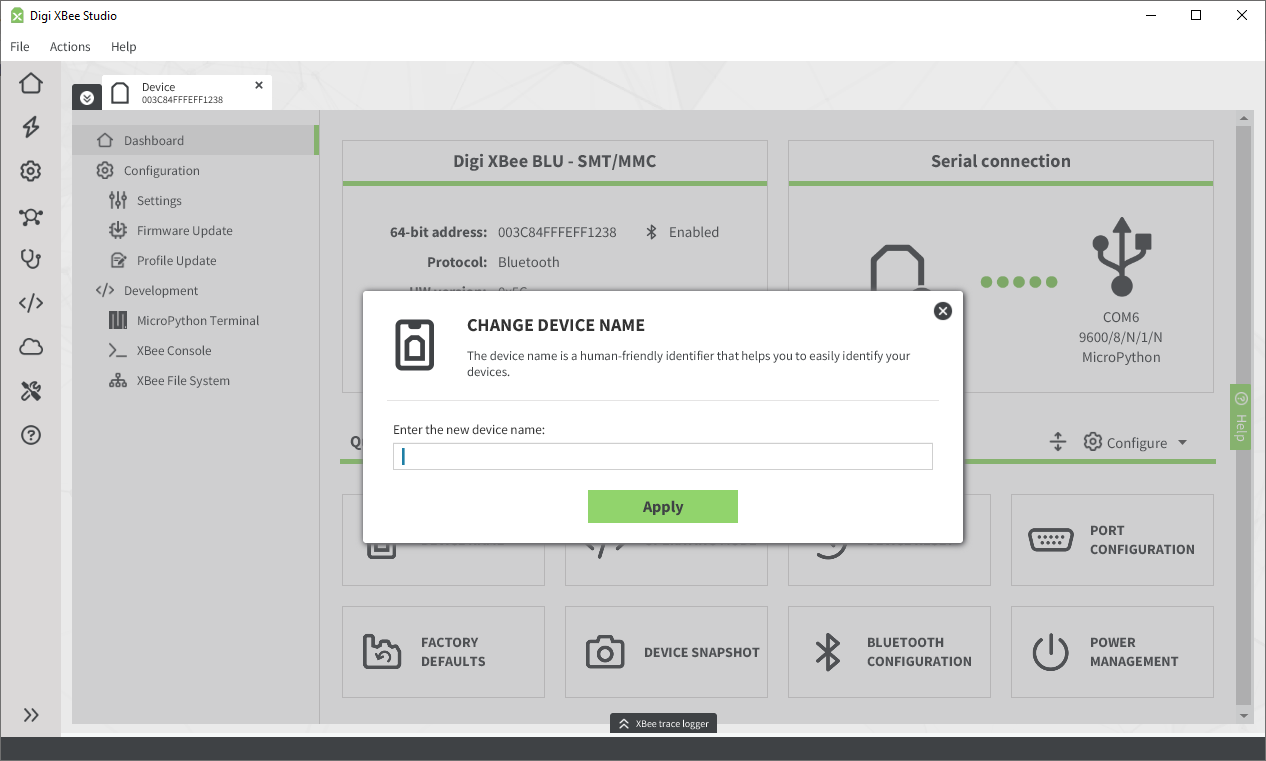
Click the Device Name quick action. A popup appears, letting you change all the settings required to update the name of the device. In this case, it is just one.

-
Set the desired name.
-
Click the Apply button and wait for the settings to be written to the device.
-
See the Dashboard section of the XBee Studio User Guide for more information. -
Using Command mode or API Frames
In addition to using the settings page or Quick Actions in XBee Studio, you can manually change the settings of your XBee 3 BLU device through other methods, which can be particularly useful when working with microcontrollers or custom setups.
Like any device that supports serial connections, the XBee 3 BLU can be configured through a terminal or console application (such as PuTTY or Tera Term) connected via UART. This is an alternative to using XBee Studio and is essential for use cases where direct communication is necessary.
XBee Studio itself configures devices using AT commands in Command mode and API frames behind the scenes. However, for a more hands-on approach, it offers a built-in XBee console tool, which allows you to directly interact with and test these manual configuration methods.
Depending on the operating mode of your device, you will be able to configure it using:
| This section assumes that you know how to connect the XBee 3 BLU device to a PC. For more information on how to connect an XBee device to a PC, see the Step 2 - Set up the hardware page from the getting started section. |
Using Command mode
An XBee module can be configured serially using an interactive built-in mode called Command mode, which is a state in which incoming characters are interpreted as commands.
You can use this way of configuring your devices in very early stages of the development cycle, for example, when you want to manually test some configurations or prototype a simple solution easily.
To set a module in Command mode, you must issue a unique string of text in a special way: +++.
When there is a full second of silence in the data stream followed by the sequence +++ (without Enter or Return) and another full second of silence, the device knows to start accepting commands locally.
| Once the module is in command mode, it listens for user input for 10 seconds. If said time goes by without any user input, the XBee automatically drops out of command mode and returns to its original mode. |
To configure the XBee 3 BLU serially using Command mode:
-
Open a console application of your choosing. It must support serial connections, like the XBee Console of XBee Studio, PuTTY or Tera Term.
-
If you are using XBee Studio, match the serial port parameters of the serial console application to those of the device so you can connect to it.
You can find the serial port configuration of your device in the device’s dashboard page of XBee Studio. -
To enter command mode:
-
Wait a full second without sending anything through the serial interface.
-
Type the character sequence
+++.Do NOT press Enter or Return. -
Wait another full second without sending anything through the serial interface.
-
After this, you should receive an
OK.
-
-
Type the desired command you want to read/modify preceded by the character sequence
AT, for example:-
ATNI: To read the value of theNIsetting. -
ATNIDevice_1: To set the value of theNIsetting toDevice_1.
-
-
Press Enter to send the command and get the response.
| To learn more about reading and writing parameters in AT Command mode, see AT Command mode. |
Using API Frames
When working in API or API escaped operating modes, all data entering and leaving the module through the serial interface is structured and contained in API frames, which define operations or events within the module.
While the best use case for this approach involves using a microcontroller with access to external APIs to manage API frames, the following example uses XBee Studio’s XBee console tool to help you understand how API frames work. This tool has built-in support to create and understand API frames sent to and received from your module, which will help you abstract from the complexity of building frames manually.
| The Application development section contains a complete example as well as additional supporting information. |
To configure the XBee 3 BLU serially using API frames with XBee Studio:
-
Connect your device to a PC where XBee Studio is installed.
This section assumes that you know how to connect the XBee 3 BLU device to a PC. For more information on how to connect an XBee device to a PC, see the Step 2 - Set up the hardware page from the getting started section. -
Open XBee Studio.
-
Wait for your device to be discovered.
A module that’s never been configured should be discovered automatically, but if you have problems discovering your local device, see the Device discovery tools section of XBee Studio User Guide to learn how to do it manually. -
Click on the device. The Dashboard page appears. It contains the device information, connection interface and a list of quick actions.
-
Verify the module is working in API mode, if not, set it.
You can do this using Quick Actions to simplify the process or manually in the Settings page:
-
Click on the Settings item in the sidebar of the tab, located within the Configuration section.
-
Search for the setting you want to update, in this case
AP. You can use the search box at the top toolbar within the device tab. -
Change the value of the setting to
API Mode Without Escapes [1]. -
Write the value to the non-volatile memory of your device by clicking the Write setting button (pencil icon) on the right side of the selected setting. This triggers a write operation on the device.
-
Find the Operating mode quick action and click it. A popup appears, letting you change the operating mode.
-
Set the operating mode to API Mode Without Escapes
-
Click the Apply button and wait for the configuration to be written to the device.
-
-
-
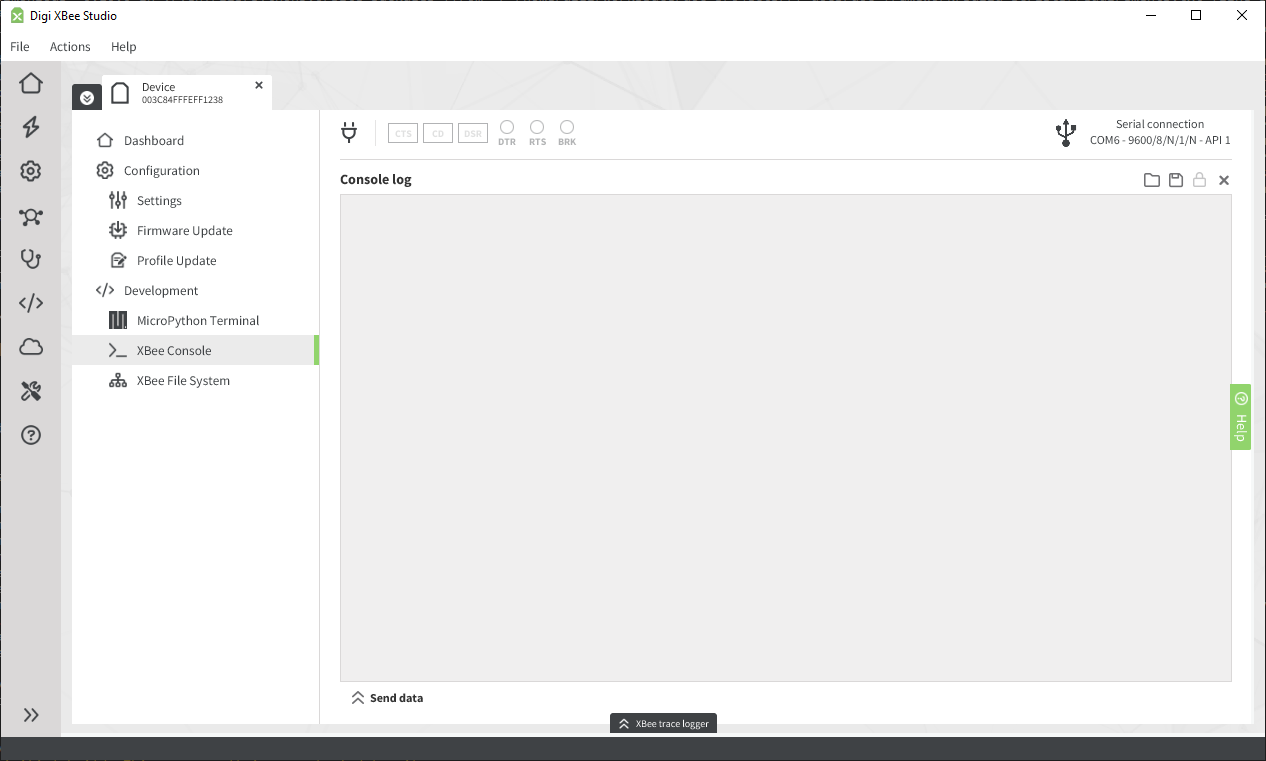
Click the XBee Console item in the sidebar of the tab, located within the Development section.

-
Open the connection by clicking on the plug adapter icon on the top toolbar.
-
Expand the bottom part of the console by clicking the Send data button on the bottom left side of the page.
-
Click the Add packet button (plus sign in the bottom toolbar on the right).
-
In the popup window, click Create an API frame.
-
After the window expands, select the 0x08 - AT command option in the Frame type combo box.
-
In the AT command field, type the command you want to set; in this case,
NI. -
In the Parameter value field, optionally enter in a value for the
NIsetting if you want to update it. Leave the field empty to only read the value of the command.
-
-
Click Save.
-
-
Select the frame in the table in the lower part of the page.
-
Click the Send selected packet button at the bottom right corner.
-
The frame is sent (listed in a blue box in the Console log) and another one is received as a response (red box). Click any of them to inspect their contents.
| To learn more about API Frames, see API frames. |
Using XBee Mobile app
XBee devices can be configured through different interfaces. The serial interface was explored in the previous sections, but devices can also be configured wirelessly via Bluetooth or programmatically through MicroPython.
To configure a device over Bluetooth, you need a smartphone or tablet with the XBee Mobile app installed.
In a production cycle, you would configure your device via Bluetooth after the deployment phase to provision the device with specific information on site, to manage possible problems it may report or to meet new application requirements.
To configure the XBee 3 BLU wirelessly over Bluetooth using the XBee Mobile app:
| Only perform this action if Bluetooth is disabled on your XBee 3 BLU device. In order to discover your device using the XBee Mobile app BLE must be enabled on your device. |
-
Connect your device to a PC where XBee Studio is installed.
This section assumes that you know how to connect the XBee 3 BLU device to a PC. For more information on how to connect an XBee device to a PC, see the Step 2 - Set up the hardware page from the getting started section. -
Open XBee Studio.
-
Wait for your device to be discovered.
A module that’s never been configured should be discovered automatically, but if you have problems discovering your local device, see the Device discovery tools section of XBee Studio User Guide to learn how to do it manually. -
Click on the device. The Dashboard page appears. It contains the device information, connection interface and a list of quick actions.
BLE can be enabled either through Quick Actions, which simplify the configuration process (only valid for the supported actions), or manually through the Settings view. -
Go to the Settings page of your device and:
-
Set the Bluetooth Identifier (
BI) setting toXBee_BLU_1. -
Set the Bluetooth Enable (
BT) setting toEnabled [1]. -
Configure the authentication to communicate with your device by clicking the Configure button on the Bluetooth Authentication setting. Type a new password in the Password field of the Basic configuration section in the popup.
Memorize this password because you will use with the mobile application. You can change the password at any time following the above process. -
Click the Write settings button on the top toolbar and wait for the settings to be written to the device.
-
-
In the Quick Actions section of the Dashboard page of your device click the Bluetooth Configuration quick action.
-
Set the Enable Bluetooth Low Energy interface checkbox to enabled.
-
Enter a value of your choice in the Identifier field.
In order to use the XBee Mobile app, you should start the Identifier value with the word XBee. If you don’t want to, remember to disable the filter in the app when you use it for the first time. -
Enter a value of your choice in the Password field.
Memorize this password because you will use with the mobile application. You can change the password at any time following the above process. -
Click the Apply button and wait for the settings to be written to the device.
-
-
-
Open the XBee Mobile app. (Make sure Bluetooth is enabled on the phone or tablet.)
-
Wait for your device to be discovered and select it once it appears in the list.
-
Introduce the Bluetooth authentication password of your device.
-
In the device main page, tap on the Settings utility.
-
In the settings page, select the Diagnostics category and find the
NIsetting. -
Configure the setting with the desired value and click Write.
| To learn more about how to configure your devices over Bluetooth, visit the XBee Mobile app user guide. |
Using MicroPython
You can also configure settings programmatically via a MicroPython application running on the XBee 3 BLU device. This application can control various features of the device, including updating the firmware settings.
Updating settings programmatically is particularly useful once the module is deployed, allowing your XBee 3 BLU device to adapt its behavior based on how it is programmed.
| To learn how to use MicroPython with your XBee 3 BLU devices, see MicroPython application development. |


