Create profile wizard
The Create profile wizard allows you to create a new configuration profile to be used later in XCTU or other XBee management applications. You can access this wizard either from the Profile editor tool or from the toolbar of the Configuration working mode view. See Create a configuration profile for more information.
Once the wizard is open, follow these steps to configure and create a new configuration profile:
- In the first page of the profile you can set the profile description and the configuration features:
- Flash radio firmware. With this setting you can decide if the profile will flash the firmware in the XBee module or not. If you check it you can choose one of the following flash options:
- Flash if firmware is different. Firmware is flashed in the module only if the firmware version that the module is running is different from the one specified in the profile.
- Flash always. Firmware is always flashed regardless of the version running in the device.
- Reset module to factory defaults before applying settings. Check this option if you want to reset the XBee module to its default values (equivalent to send an RE command) before configuring the firmware parameters.
Format existing file system. You can check this option to format the existing file system of the device when applying the profile. If you choose to flash a new file system too, the format step will be performed before flashing the new file system.
Flash a new file system. With this setting you can attach a file system to the profile that will be transferred to the XBee module when applying the profile. Notice that the Format existing file system option is automatically checked when you check this one.
- Use custom scripts. When creating a profile with this setting, you can indicate a pre-processing script or a post-processing script, or both to be used when programming devices with XBee Multi Programmer.
- This feature allows you to write your own scripts using your own libraries or the ones provided by Digi to interact with your XBee devices.
- Pre-processing script: This script is run before applying the profile to the XBee device. Use it to read specific information of your device before applying the configuration profile.
- Post-processing script: This script is run after applying the profile to the XBee device, as a final step. With it you can set specific configurations to your devices, for example, use it to set a different Node Identifier on each of your XBee devices.
Note This feature can only be used by XBee Multi Programmer. Other tools will skip the custom scripts steps when applying a profile to an XBee device.
- Flash radio firmware. With this setting you can decide if the profile will flash the firmware in the XBee module or not. If you check it you can choose one of the following flash options:

- Click Next to configure the XBee firmware of the profile. Choose the desired firmware selecting its corresponding properties:
- Product family of the firmware.
- Function set that determine the functionality of the firmware (mode of operation, special sensor and adapter settings, and so forth).
- Firmware version. The most recent firmware version appears at the top of the list.
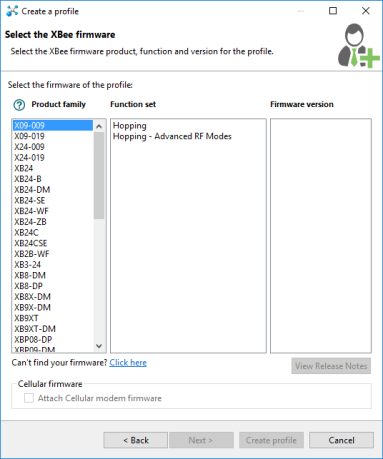
Note If you accessed the wizard from the Configuration working mode, the firmware should already be selected with the firmware that the XBee device is running.
- Click Next to configure the XBee firmware parameters. This page displays all the firmware settings split in categories. Each configurable setting has a checkbox at the left side. Check and edit the value of those settings you want to be configured by the profile.
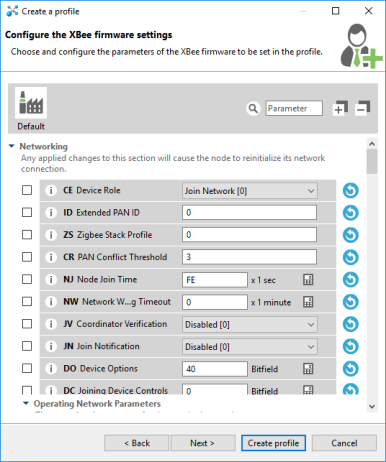
Note If you accessed the wizard from the Configuration working mode, the firmware settings should be already checked and selected with the ones configured in the XBee device.
- Click Next to set a file system to the profile. If the profile is configured to attach a file system—the first page of the wizard—you can use the Browse button to specify it here.
Updating the file system of remote devices must be performed through a remote file system image. So, if the target firmware supports it and you want the profile to flash a file system in remote devices, you must check the Attach a remote file system image option and then specify the image using the corresponding Browse button. If the target firmware does not support OTA file system updates, the Attach a remote file system image option will not be displayed.
Note If you do not know how to obtain a remote file system image, see Update the file system of remote devices.

-
Click Next to set the pre and/or post scripts to be executed when flashing the profile with XBee Multi Programmer.
This feature allows you to run a script/program before and/or after applying a profile to the target device. This wizard page is split into two sections, one for the pre-processing script, and the other for the post-processing script. Depending on whether you want to run the pre-processing script or the post-processing script, or both, fill in the appropriate information on each section respectively. Each section contains fields to indicate:
- The command to execute. Use whatever scripting language you want, but make sure it can be used by the machine that applies the profile. For example, if the command to run is: pyhton set_node_id.py, it is mandatory that the correct Python interpreter is installed and accessible in the machine that applies the profile.
- The maximum timeout for the script. By default, it is five minutes. This is the maximum time XBee Multi Programmer should wait for the script to finalize its execution. When this time has passed, if the script has not finished, XBee Multi Programmer will assume your program got locked, and will stop the execution of the script returning a Timeout Exception. This parameter is specified in minutes, and its valid range of values goes from 1 to 300 minutes.
- Optionally, the folder containing the script/program to run. This is a directory containing the script to be run and all of the resources it might need during its execution. It is not mandatory to attach any script to the profile, as long as it is accessible by the machine that applies the profile. To indicate the script/program to run, use one of the following:
- Attach the folder that contains the script to the profile. To do so, click the Browse button of the corresponding section. Select the complete folder that contains your script—this will be the execution path. It does not matter that in order to run the script needs multiple files, as long as they are all included in the selected folder. If external resources are required by the script, make sure they are properly handled within your script, or include them in the same folder as your script so they are attached to the profile.
- Use absolute paths to call a script that already exists in the machine that will apply the profile. The first field of each section (the command) can be called using absolute paths. Bear in mind that such script needs to handle all paths in an absolute manner, as well. In this case, the execution path will be the path where the XBee Multi Programmer was installed.

- When you have all the profile parameters configured, click Create profile to open the save file dialog.
- Select the destination path and click Save to create the profile.
 PDF
PDF


