Introduction
How often have you run into problems when installing or replacing signed or inbuild files with newer, unsigned versions? The “magic” behind this is called Windows File Protection (WFP). In Windows 2000 and Windows XP, Windows File Protection prevents the replacement of protected system files such as .sys, .dll, .ocx, .ttf, .fon, and .exe files. Windows File Protection runs in the background and protects all files installed by the Windows Setup program. Windows File Protection detects attempts by other programs to replace or move a protected system file. Windows File Protection checks the file''''s digital signature to determine if the new file is the correct Microsoft version. If the file is not the correct version, Windows File Protection either replaces the file from the backup stored in the dllcache folder or from the Windows CD. If Windows File Protection cannot locate the appropriate file, it prompts you for the location. Windows File Protection also writes an event to the event log, noting the file replacement attempt.
Step-by-step instructions
A. Signed/inbuild driver is not installed, driver is not supported inbuild
No additional steps are required in this scenario. Just install the signed or unsigned driver.
B. Signed/inbuild driver is not installed, driver is supported inbuild *
In this scenario it is sufficient to delete the (old) inbuild INF files (incl. matching *.PNF) from the %windir%inf
directory.
C. Signed/inbuild driver is installed *
It requires several steps to prepare a Windows 2000/XP/.NET system to accept unsigned drivers, if signed or inbuild drivers are already installed.
1. Remove the Windows CD from the CDROM drive.
2. Rename the driver.cab file in the %windir%Driver Cachei386 directory to driver.cab.old.
3. Delete all files from the %windir%system32dllcache directory (Windows XP and newer).
4. Delete all old INF files (incl. matching *.PNF) from the %windir%inf directory. Keep in mind that the INF files might have their original name as well as one or more OEM*.INF names.
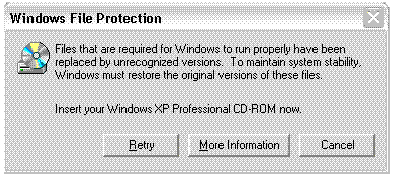
The following two dialogs indicate that the above steps have been successful, after you have installed an unsigned driver or replaced a signed or inbuild file with an unsigned version:

Click "Cancel".

Click "Yes".
That''''s it!
*Please note: These instructions are very general. Most new Digi driver packages have specific installation and update instructions in the readme.txt file included with the package. Digi has included utilities which will perform the removing and deleting Digi''''s oem*.inf so that you should not have to manually remove or delete files. Please see each driver''''s readme.txt file for details.
Last updated:
Jan 11, 2024