Welcome to our blog post series on the Digi XCTU® tool for configuring and testing Digi XBee® devices. Here are the previous posts in this series:
Using Digi XCTU to Measure Throughput Between Digi XBee Devices
The primary job of a wireless IoT network is moving data. For designing and planning, it's essential to understand how much data your network can handle, including all the different links and configurations. The Digi XCTU Throughput Tool lets you directly measure the communications rate between any two Digi XBee multi-point or mesh network modules.
Simply connect one radio module to Digi XCTU, then test your bandwidth to any other Digi XBee radio on the same network. You can run a single test to check instantaneous throughput, or map bandwidth over time by running continuously to help track down sources of variability. The Throughput Tool is also great for testing "what if" scenarios, quantifying performance in the lab vs. in the field, performing on-site network surveys, and more.
We'll walk through some examples using the Throughput Tool, so you can learn about this powerful XCTU feature hands-on.
Parts Required
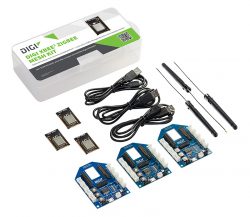
Basic Setup
Begin by following the instructions in the XCTU Configuration article to:
- Download Digi XCTU.
- Connect a Digi XBee3 to your computer with a Grove evaluation board.
- Open Digi XCTU and select Add Device to connect to the Digi XBee3:

Configure a Local Digi XBee Module
Next, configure the locally-connected Digi XBee3 to be a coordinator in API mode. For a complete walkthrough of this process see our Manage XBee Networks Wirelessly with XCTU article. The basic steps are:
- Change the setting for AP API Enable to be "API Mode With Escapes [2]".
- Change the CE Device Role to "Form Network [1]". Click on the pencil icon to write your change to the firmware.
- Optionally, you can change NJ Node Join Time to be FF, which is a special setting that removes all join time limits.
Assemble Network Hardware
Assemble and power your two remote Digi XBee3 modules. Each should be mounted on an evaluation board, then connected to a USB power source. This can be a computer, or any USB battery or power adapter. By factory default, Digi XBee3 Zigbee modules will join any available network, so we don't need to configure them for this example.
Access Remote XBee Modules
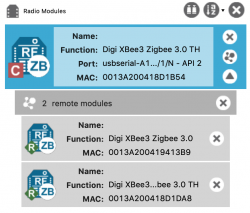
To test throughput, XCTU needs to know about the remote Digi XBee3 radios. Click on the network icon displayed with the local radio module on the right side of its box, shown circled in red here.

XCTU will search the radio network associated with your local module for other Digi XBee modules on the same network. Click on "Add selected devices" to include those remote XBee modules in your collection. They'll be displayed right below your local module.
Map Devices
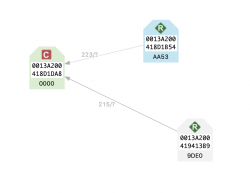
Your coordinator should now be able to see both of the remote Digi XBee Zigbee router nodes. You can check this in the network mapping screen. See the complete instructions for using network maps in the "Map Your Digi XBee Network with XCTU" article.
Assuming both nodes are relatively close to the coordinator, the map may look something like this:
Throughput Test
With a coordinator radio set up and remote radios powered on and discovered, you're ready to measure throughput to either of the remote Digi XBee3 modules. Here's how to get started:
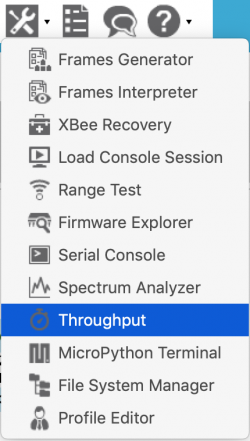
- Open the Throughput Tool by selecting Throughput from the Tools menu as shown.
- Click the local radio device to select it, then pick a remote module from the list of discovered devices.

- Select Bidi- Cluster ID 0x12 for bi-directional communication using Zigbee cluster ID 12 to electronically loop back all delivered payloads to the sender.

- Choose a duration for the test in seconds and a time frame for the graph. We suggest starting with 60 seconds and a one-minute timeframe for your first throughput test.
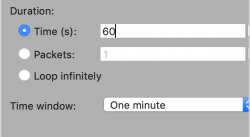
- You're ready to start now. Click Start Throughput to begin the test.

- Watch the graph fill up with transfer rate data. You'll note higher throughput with Digi XBees that are fewer hops away, and lower throughput to radio nodes that require multiple hops to reach. Distance, signal absorption and environmental noise can all reduce throughput as well.
[caption id="attachment_18102" align="alignnone" width="350"]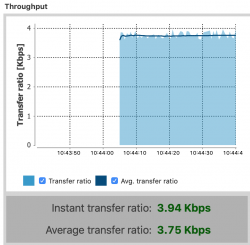 Zero hops, higher throughput[/caption] Zero hops, higher throughput[/caption] |
[caption id="attachment_18103" align="alignnone" width="350"]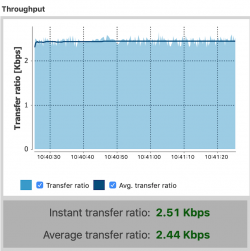 Multiple hops, lower throughput[/caption] Multiple hops, lower throughput[/caption] |
Throughput Test - Live
This video walks through a complete throughput test, including selection of the local and remote Digi XBee nodes, confirmation of the settings, one minute of testing (sped up) and the resulting graph. These tests can be easily created by anyone.
Throughput Tool Tasks
The Throughput Tool supports a variety of important network design and management tasks. You can use it to estimate network capacity, or to make sure there's enough bandwidth to support your expected data communications needs. It's also helpful for understanding the relationships between different parts of a mesh network, identifying places where throughput bottlenecks might obstruct data delivery, and underused areas with capacity to support additional sensors.
The Throughput Tool can log bandwidth over time. This can help track down intermittent issues such as radio noise or environmental absorption that changes over time. The tool can also help confirm that a network meets application and customer requirements by using live tests of network throughput to demonstrate full compliance.
Throughput testing can be tremendously helpful, and it's only one of the powerful Digi XCTU tools that can help design, deploy and debug your network. In an upcoming article we'll explore XCTU's Range Testing features directly, to show how Digi XCTU can help you properly plan working deployments, even in tough radio environments. XCTU will have you winning at wireless every day.