Load an SSL certificate
If needed, you can replace the default self-signed certificate configured for the Web Administration service with a new certificate for a Hub that is signed by a CA.
Note If an SSL certificate for a Hub is not defined, the certificate for the web administration service is used.
The entire certificate chain, not just the primary certification, must be saved to the AnywhereUSB Plus. The certificates must be in PEM format.
The certificates must be stored in this order:
-
Primary certificate
-
Intermediate CA certificate
-
Root CA certificate
-
Private Key
To load an AnywhereUSB Plus SSL certificate:
-
Paste the SSL certificate (and any others) and the Private Key into an app such as Notepad, for ease of retrieval.
Note The order in which these are pasted is important: SSL certificate must be first, followed by the Private Key. If additional certificates are included, the order is: Primary certificate, Intermediate CA certificate, Root CA certificate, and Private Key.
-
Load the SSL certificate and Private Key.
-
Copy the certificate(s) and the Private Key from Notepad.
-
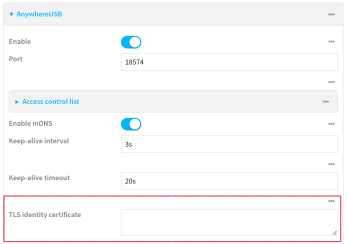
Navigate to System > Device Configuration > Services > AnywhereUSB.
-
In the TLS identity certificate field, paste the certificate(s) and key. You will see the contents of the SSL certificate and the Private Key. The SSL certificate must be first, followed by the Private Key.
----BEGIN CERTIFICATE----
(primary cert)
----END CERTIFICATE----
----BEGIN PRIVATE KEY----
(private key for primary cert)
----END PRIVATE KEY----
If an Intermediate CA certification and a Root CA certification is added, they must be added in the order shown:
----BEGIN CERTIFICATE----
(primary cert)
----END CERTIFICATE----
----BEGIN CERTIFICATE----
(intermediate CA cert)
----END CERTIFICATE----
----BEGIN CERTIFICATE----
(root CA cert)
----END CERTIFICATE----
----BEGIN PRIVATE KEY----
(private key for primary cert)
----END PRIVATE KEY---- -
Click Apply.
-
-
Click System > Reboot.
-
After the reboot is complete, verify the certificate upload.
-
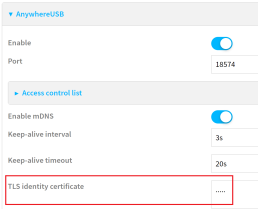
Navigate to System > Device Configuration > Services > AnywhereUSB.
-
If the upload was successful, five dots display in the TLS identity certificate field.
-
Update the SSL certificate in the AnywhereUSB Manager.
-
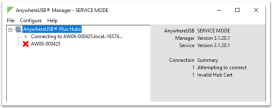
A red X displays next to the name of the Hub for which you uploaded the SSL certificate. In the Connection Summary section, the Invalid Hub Cert message displays.
-
Select File > Preferences. The Preferences dialog displays.
-
Click Restore Default Settings. A dialog displays.
-
Click OK to close the dialog.
-
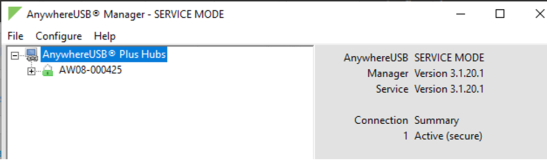
In the Preferences dialog, click Save to apply the new SSL certificate.
-
In a few seconds, the red X changes to a green padlock.
-
Verify the SSL certificate in a browser window by viewing the site information.
-
Close the web UI and close the browser window.
-
Open a new browser window and open the web UI.
-
In the address bar, where you enter a URL, hover over the padlock. The View Site Information link displays. Click the padlock.
-
Click Connection is secure.
-
Click Certificate is Valid to view the certificate.
-
 PDF
PDF


