The following is information about deploying, running, and monitoring an Ignition Edge application running inside a Digi Containers service available on a Digi router through Digi Remote Manager
Disclaimer: Digi provides a compute environment for customers and partners to deploy their own container-based applications. The Digi technical support team neither develops any custom container applications, nor supports these containers developed by the customer or partner. It is the sole responsibility of customers and/or partners to develop, test, deploy, and support any custom container applications running on Digi devices. Digi does not fix any bugs in the containers deployed onto Digi devices. Also, Digi does not guarantee that these container applications continue to work on newer firmware versions. For support in developing or troubleshooting custom containers, please contact our Professional Services team.
What are Digi Containers?
Digi Containers Service is an add-on service that simplifies and centralizes the process of building, deploying and running custom applications on devices managed with Digi Remote Manager® (Digi RM). With a Digi RM license and Digi Containers, you deploy containerized programs or Python applications at scale and on any device running DAL OS.
Implemented via Lightweight Linux Containers (LXC), Digi Container Service makes the process portable, scalable, secure, fast and efficient. Digi empowers companies to orchestrate and manage a complex series of containers in various structures and configurations across enterprise, industrial, transportation and other use cases.
Digi Containers Product Page
Digi Containers Datasheet
What is Ignition Edge?
Ignition Edge is a software-based SCADA solution and tool for communicating with industrial equipment with various protocols (MQTT, Sparkplug B, OPC-UA, MACnet, IEC 61850, DNP3, and many more)
https://page.inductiveautomation.com/ignition-edge
The Ignition Edge software is available on the Inductive Automation company website, and includes installers for Linux, Windows, MacOS, and embedded ARM Linux devices.
https://inductiveautomation.com/downloads/archive
The system requirements state that you need 1GB of RAM and 1GB of flash storage space. However, that memory requirement is on the large-end and is likely based on running several protocols and modules at once. Just running the IgnitionEdge application consumes less than 200MB of RAM
The IgnitionEdge software comes with several libraries, scripts, and binaries. This is the perfect scenario to provide via a LXC container
Setup Instructions
The following instructions are to setup the Ignition Edge on an ARM64 Digi device running DAL OS, such as the IX40 or TX40. The device needs at least 1GB of memory and 2GB of disk storage available (to house both the container tarball and the persistent container once it’s running). For more details on the list of Digi DAL OS devices that supports Digi Containers and have enough memory to support running the Ignition Edge application, see the "Note on system resource limitations" section in the Digi Containers SDK article.
-
Get a DAL OS ARM64 device (such as the TX40 or IX40) running 23.9.20.63 or newer firmware. See instructions linked here for updating firmware on your Digi device.
-
Add the Digi device to Digi Remote Manager and ensure it has the Digi Containers subscription added to it
-
Download the Ignition Edge LXC container from the following link. Warning: this is a 1.5GB file, so have a good Internet connection to download it onto your PC.
-
Make sure you can access your Digi device via a local Ethernet connection, as you’ll need to transfer this LXC container onto it, so having a local Ethernet connection to the Digi device will speed things up considerably.
-
Access the shell console of the Digi device either by navigating to the Terminal page in the device's local web UI or by establishing a SSH connection to the Digi device. See Authentication groups for information about configuring authentication groups that include shell access.
-
Ensure your Digi device has at least 2GB of free space in the /opt/ directory. This can be found by running the show system verbose command from the Admin CLI or by running df -h from the shell console.
-
Use SCP or WinSCP to transfer the LXC file onto your Digi device in its /opt/ directory. Example:
scp ignition_edge.tgz admin@192.168.2.1:/opt/
-
From the Admin CLI of the Digi device, run the following command to create the LXC container config settings:
container create /opt/ignition_edge.tgz
-
Once the container is successfully created, remove the tgz file from the /opt/ directory, as this has been duplicated into /opt/lib/lxc/ignition_edge/ and is no longer required. To remove the original tgz container file, run the following command from the Admin CLI of the Digi device:
rm /opt/ignition_edge.tgz
-
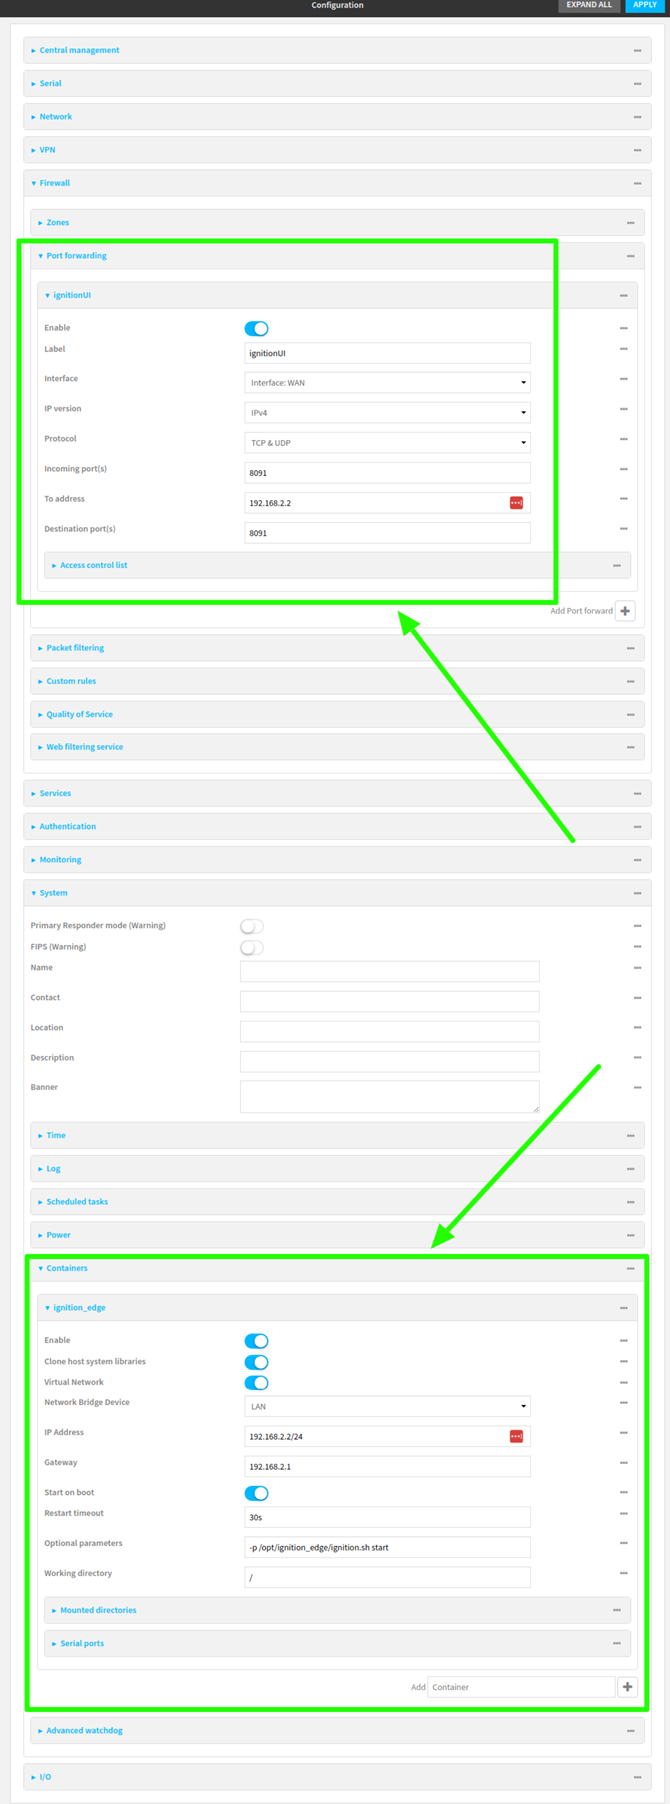
From the Admin CLI or the System → Device Configuration page in the web UI or Digi Remote Manager, enable networking on the LXC container and assign it an IP address that it can use on the Digi device’s LAN network, then click Apply. Example for a standard-config IX4
system container ignition_edge address "192.168.2.2/24"

	system container ignition_edge bridge "lan"

	system container ignition_edge gateway "192.168.2.1"

	system container ignition_edge network "true"
-
Optional: If your Digi device has an Internet connection that provides a reachable IP address, you can use that to remotely access the IgnitionEdge application. From the Admin CLI or the System → Device Configuration page in the web UI or Digi Remote Manager, setup a port forwarding rule for the WAN interface you’re using, and setup the port forwarding rule to send prot 8091 to the LAN IP assigned to the container. Example for a standard-config IX40 to forward its WAN Ethernet IP port 8091 to the IgnitionEdge container’s web UI
-
From the shell console, run the following commands to start the container in persistent mode and then start the IgnitionEdge application in the container
# lxc ignition_edge -p

	lxc # /opt/ignition_edge/ignition.sh start
-
Optional: If you want the IgnitionEdge application to start-up automatically with the Digi router, in the Digi’s config settings enable the Start on Boot option and add the ignition.sh command to the Optional parameters setting. Example:
system container ignition_edge start_on_boot "true"

	system container ignition_edge args "-p /opt/ignition_edge/ignition.sh start"
-
For review/reference, below is a full view of the configuration changes applied to the Digi device for setting up the IgnitionEdge container
-
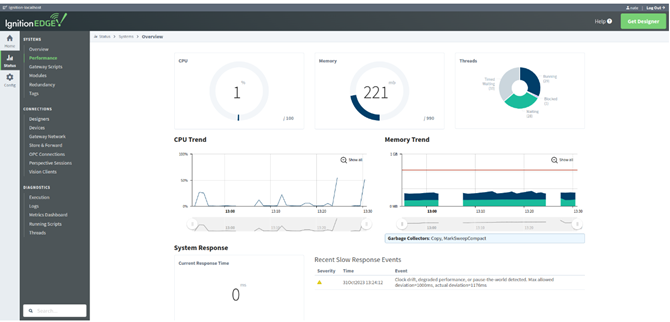
Once the IgnitionEdge app is running, you can access it at the container’s IP address on http port 8091. Example: http://192.168.2.2:8091
-
You will be greeted with a welcome screen where you can setup your user login for the app (it’s an arbitrary user for your own login/management), register your IgnitionEdge app with a license, add protocols/modules, and start running services from within the IgnitionEdge app.
-
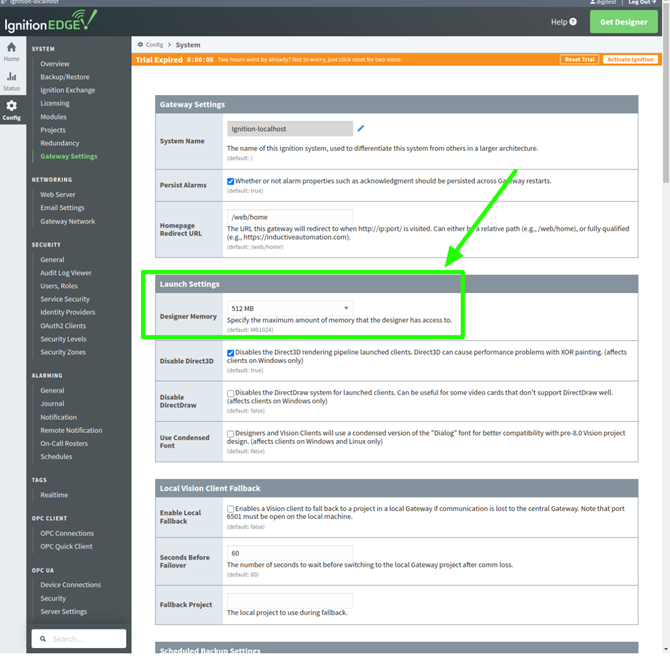
Go to the Config → Gateway Settings page and adjust the maximum memory from 1GB to 512MB. This is needed to prevent the IgnitionEdge application from consuming the entire 1GB of memory that’s available on the IX40, which can result in the system watchdog rebooting the IX40.
-
Optional: while the Ignition Edge container is running, if you would like to access the container for an interactive session, which is helpful for troubleshooting the IE application itself, you can do so by running the following command from the shell console of the IX40:
lxc-attach -n ignition_edge -- /bin/sh -l
-
Congratulations! You now have the IgnitionEdge application deployed and running on your Digi device.
Deploying and running IgnitionEdge through DigiRM
The following instructions can be followed for deploying and running IgnitionEdge on multiple Digi devices en-masse utilizing the Configurations Template feature available through Digi Remote Manager.
Prerequisites
-
Must have a premier license/account in DigiRM
-
Must have the Containers service enabled in your DigiRM account. This is done by ordering the Digi Containers license (SKU name: DIGI-RM-PRM-CS). You will need to give them your customer ID for your DigiRM account and order a license for each device you would like to deploy the container(s) onto.
-
DAL OS device running firmware version 23.9.20.63 or newer
-
Add DAL OS device to DigiRM (see instructions in the device’s quick start guide) and assign the DIGI-RM-PRM-CS Digi Containers license to the device through the Management → Subscriptions page in Digi Remote Manager 
Walkthrough
-
Create a Configurations template for your device
-
Go to the Configuration page in DigiRM. Click Create
-
Give the new template whatever name and description you want. Select the group, device type, and firmware version for the DAL device you setup in the prerequisites above. Ensure any additional devices you want to deploy the IgnitionEdge application onto are in the same group and device type in Digi Remote Manager. Click Continue
-
In the Settings step, click Import from device and select the DAL device you setup in the prerequisites above. Click Save once the settings are imported
-
In the Containers tab for the configurations template, add the container to the configuration template
-
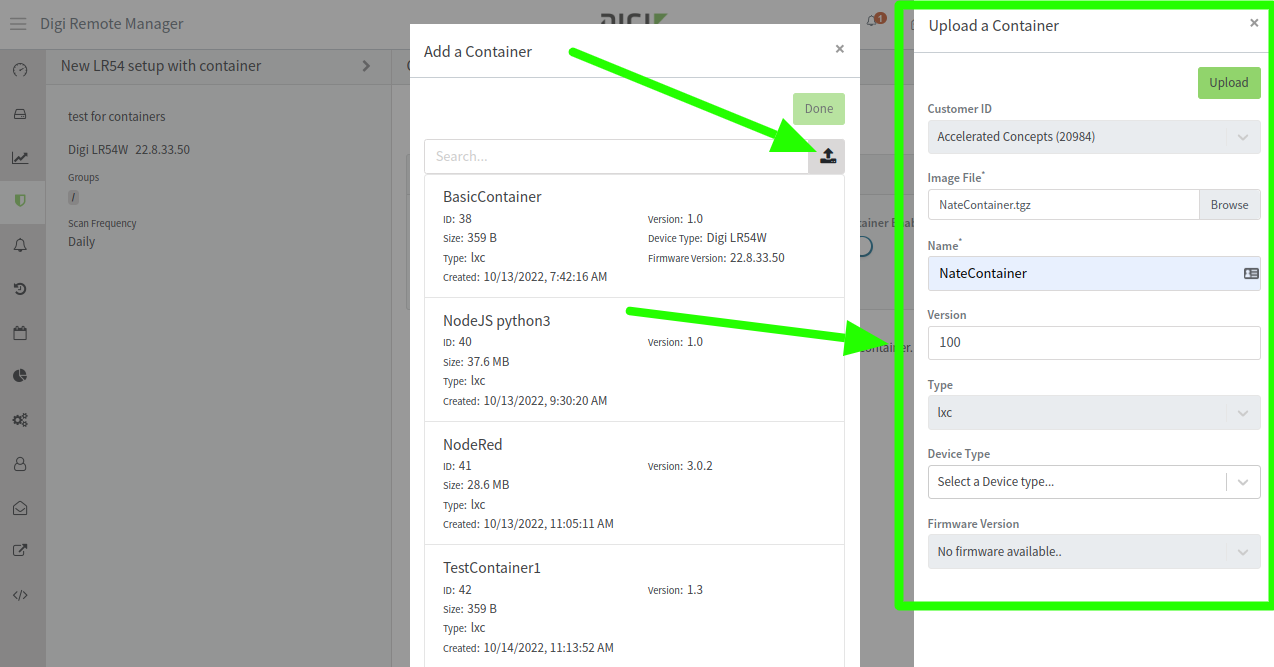
Click the + icon and then click the upload icon in the pop-up window to add a new container
-
Upload the IgnitionEdge container file you had downloaded in the steps above. Set the Name of the container to the same name as the container .tgz file. This is absolutely necessary, otherwise the container config settings and file won’t get setup on the DAL device properly. Below is an example with a container named NateContainer.tgz
-
Click Save
-
Click Continue to go through the rest of the Configuration template setup. Under the Automation step, ensure you enable the Enable Scanning and Remediate options so DigiRM will scan the target DAL device and remediate it to match the configuration, container, and firmware settings specified in the configurations template
-
Initiate a config scan/remediation to apply the container and config settings to the DAL devices
-
You can always wait for DigiRM to automatically scan/remediate the device, but if you want to test out the container sooner:
-
Look at the Configuration Scan History tab on the device’s details page in DigiRM to verify the configuration scan and remediation occurred.
-
Verify the IgnitionEdge application is running as expected in the container by accessing its web UI through the Digi device as described previously
Monitoring the status of your containers
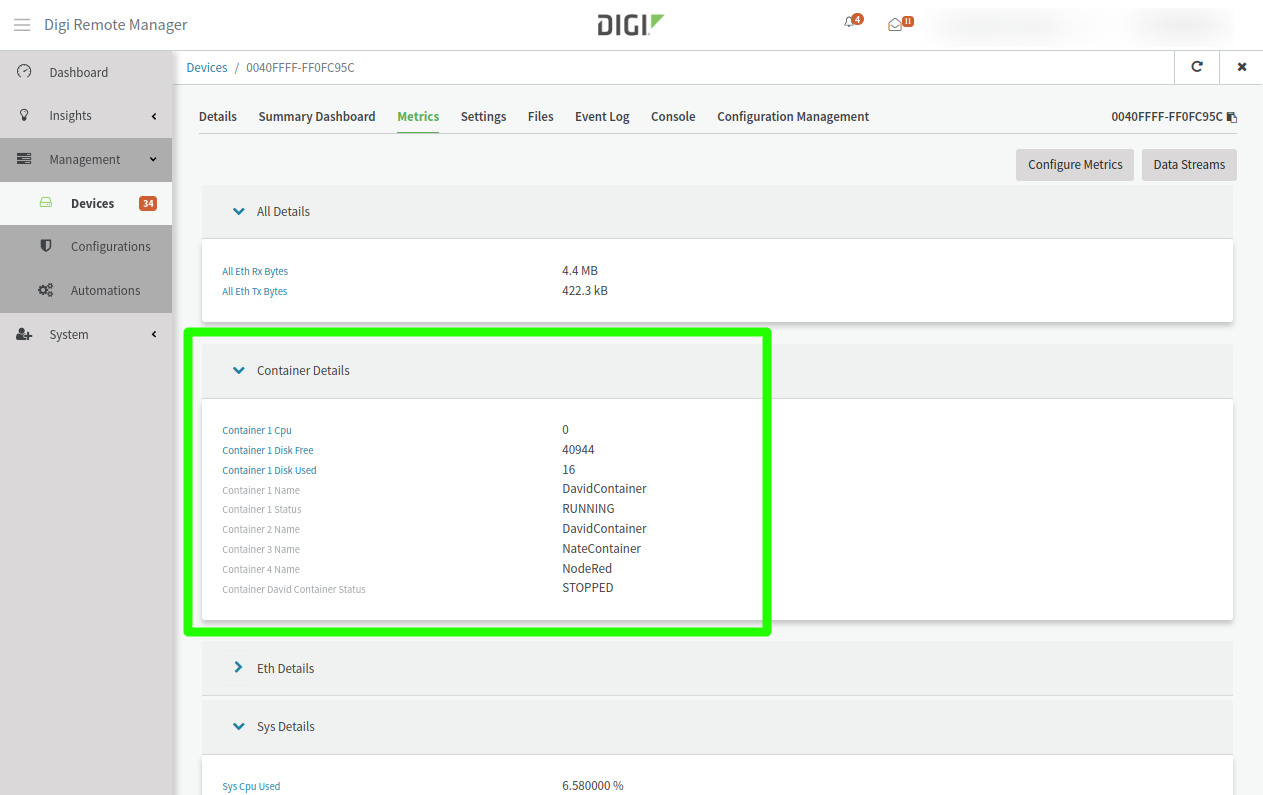
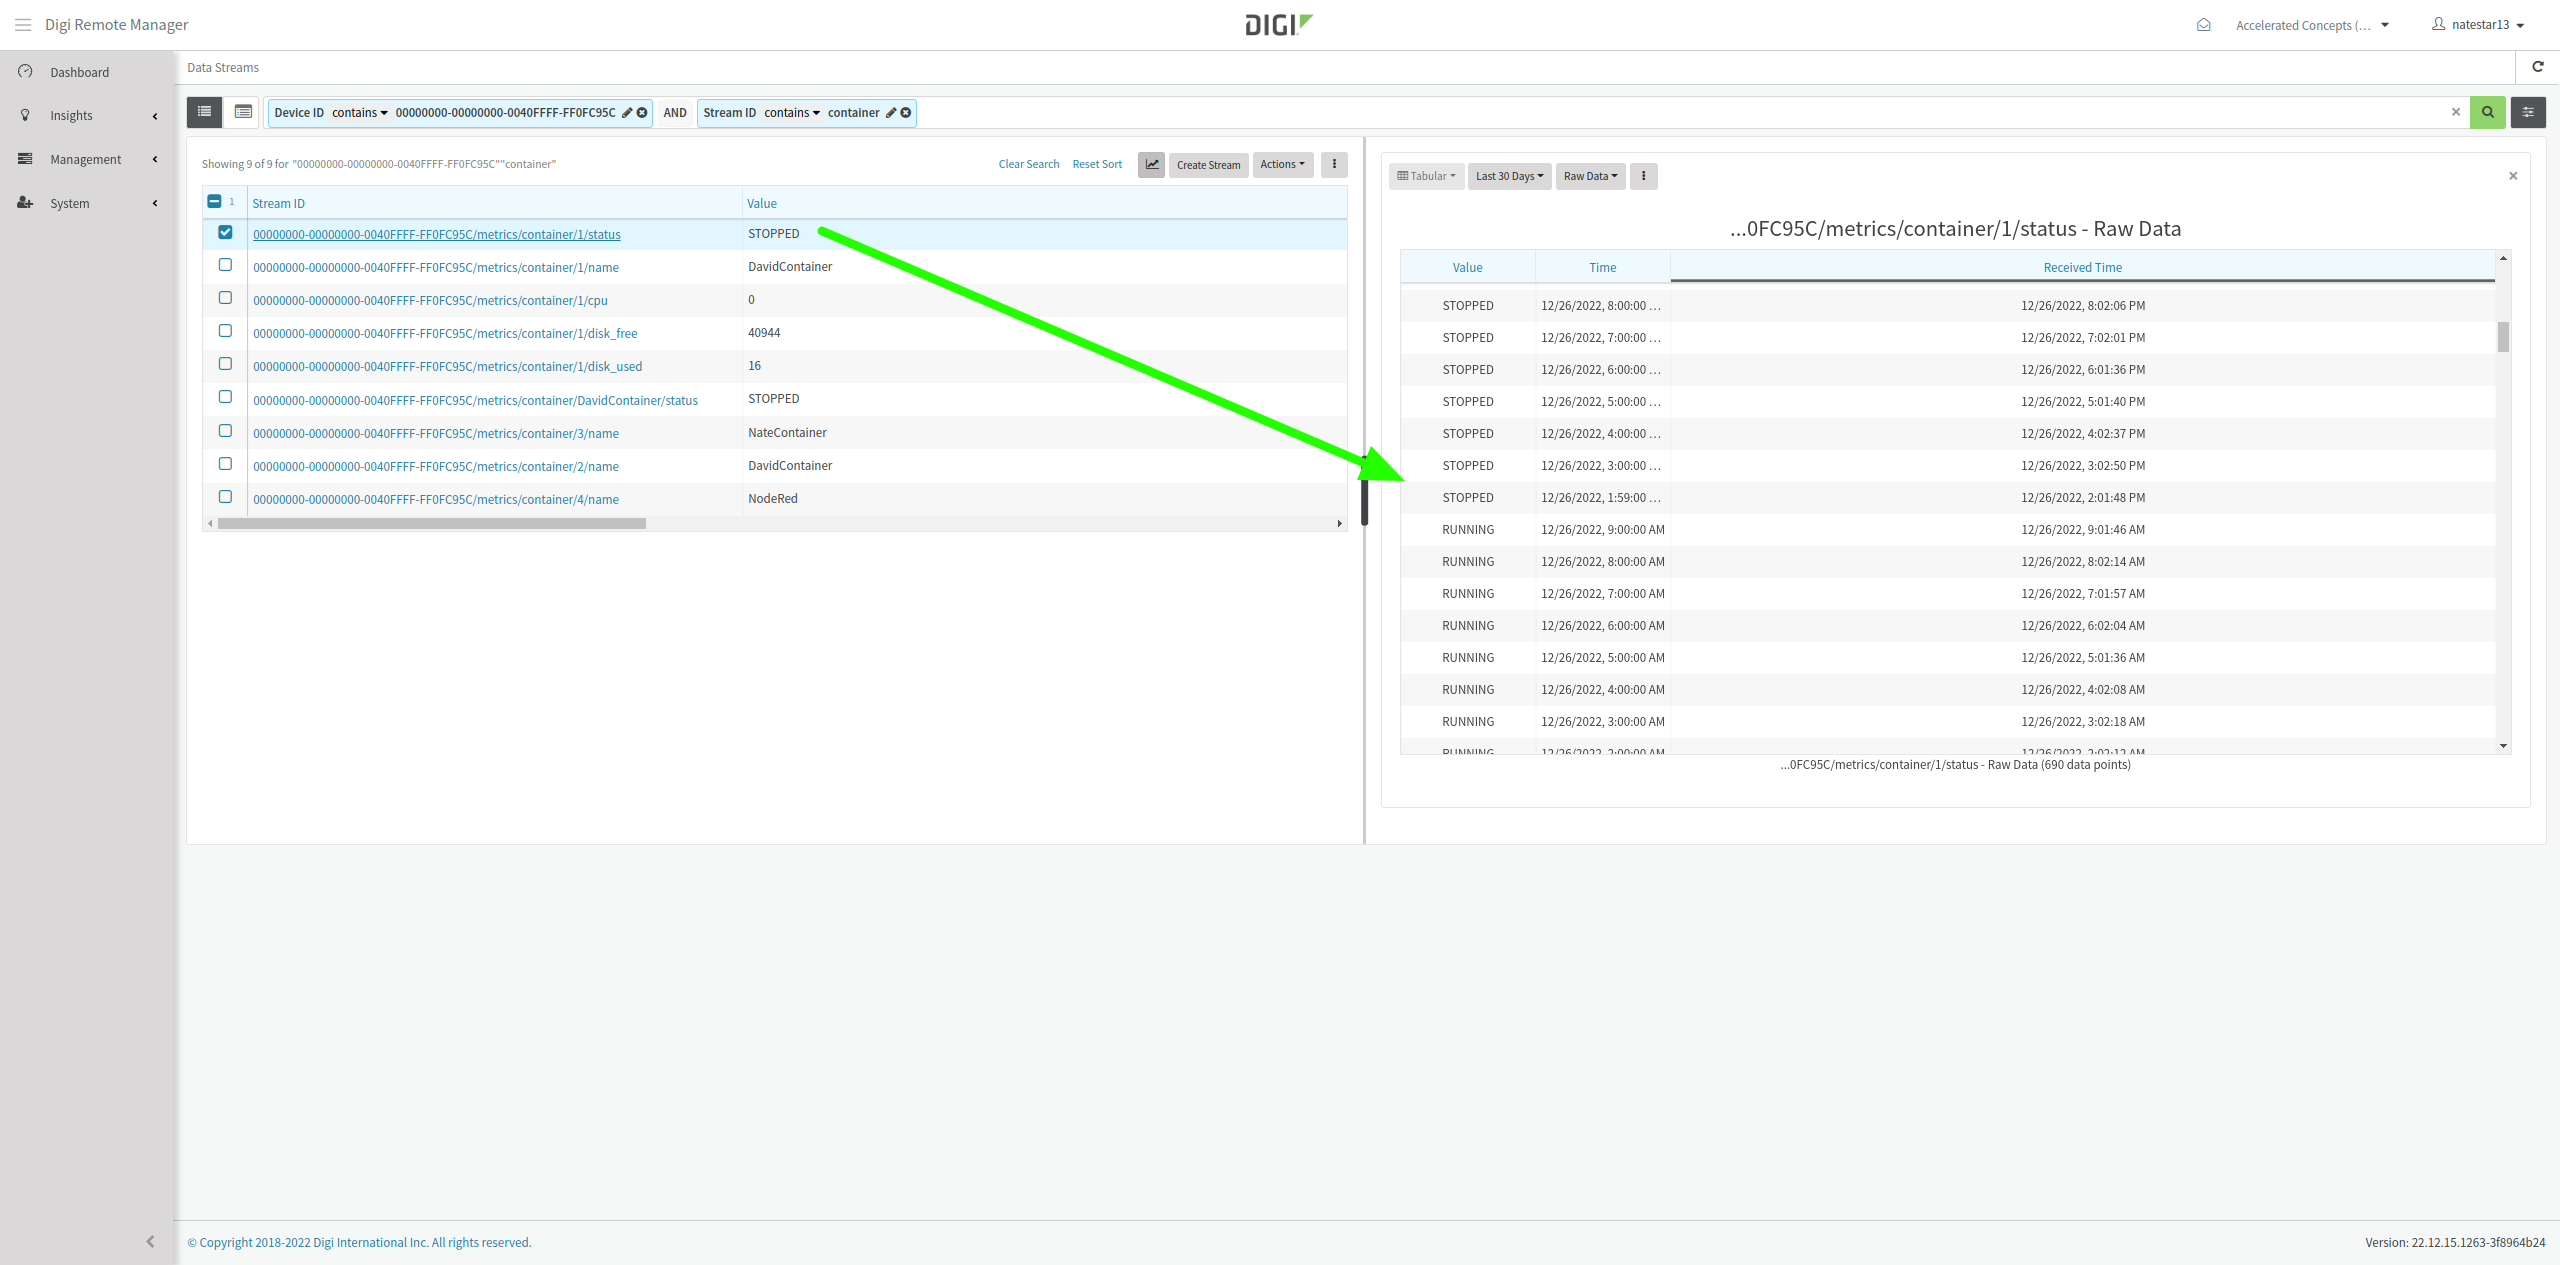
The status and runtime state of each configured container on the device is tracked in Digi Remote Manager as datastream metrics. These metrics can be viewed under the Metrics tab for the device in DigiRM, or under the Data Streams page. On the Data Streams page, each datastream metric can be clicked on to view a history of changes. See example screenshots below:
Alerting on changes in container status
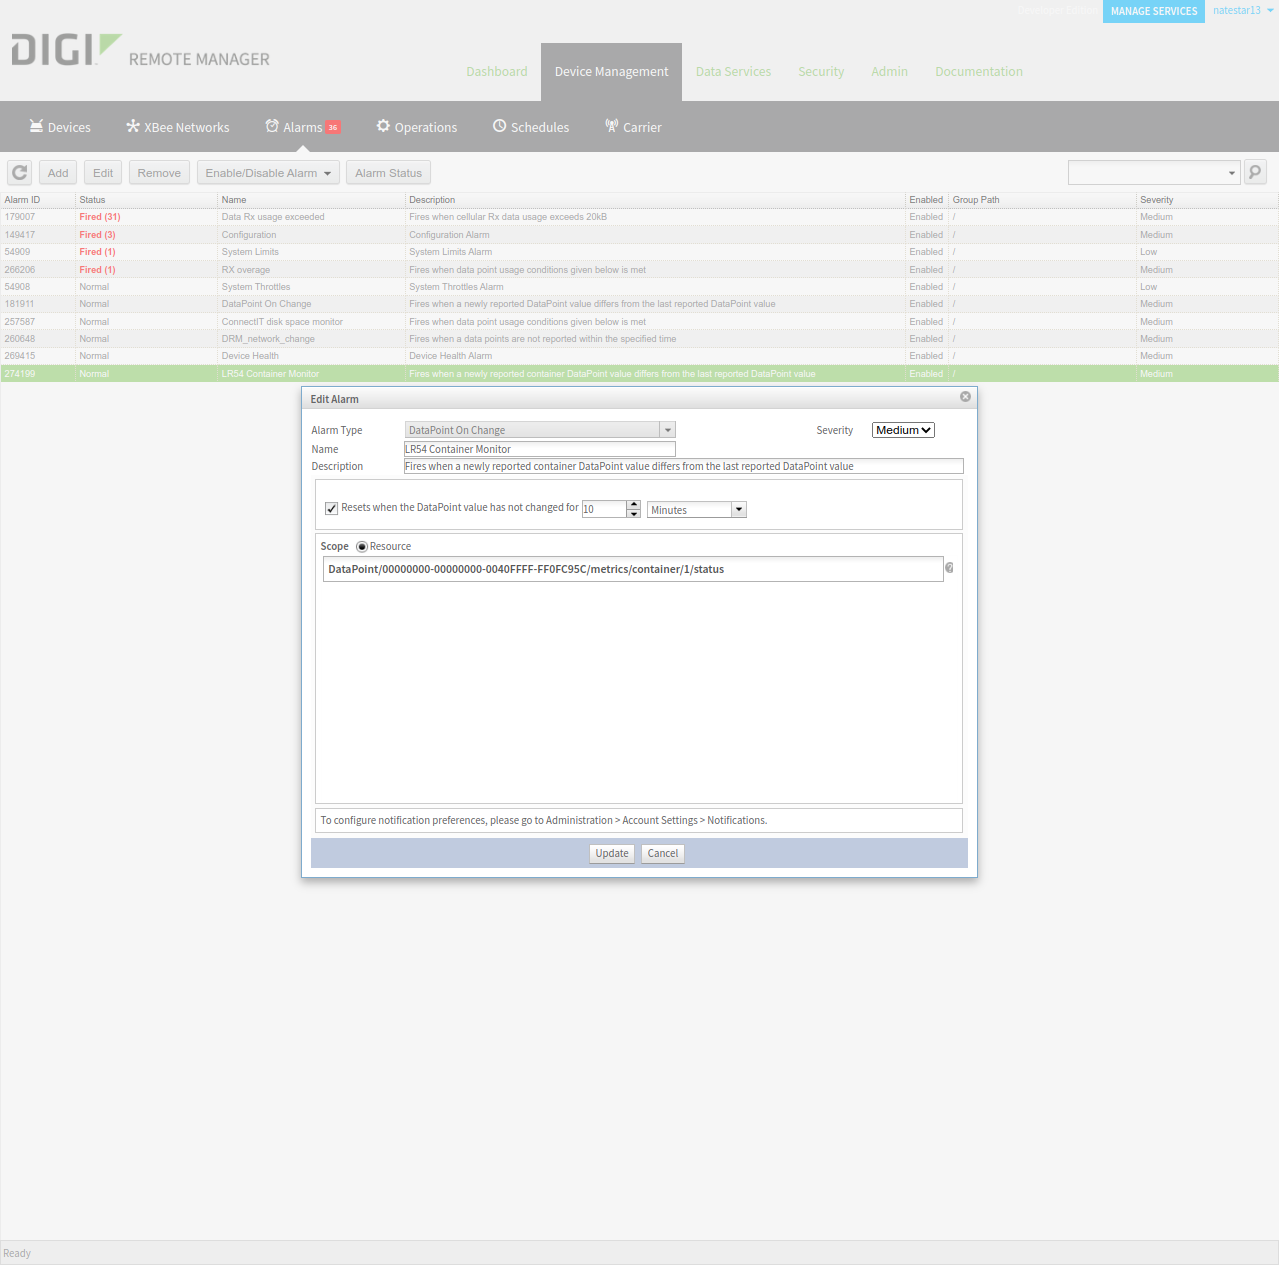
Any of the above datastream metrics listed for the container can be monitored and alerted if the state changes or if it changes by a configured amount for a period of time. For more details on setting up alerts in Digi Remote Manager, see this link to the user guide. Below is an example alert definition that would generate an email notification from DigiRM to your user’s email if the container’s status changed (i.e. from running to stopped, or vice-versa).
Last updated:
Oct 27, 2024