DHCP relay allows a router to forward DHCP requests from one LAN to a separate DHCP server, typically connected to a different LAN.
For the AnywhereUSB Plus device, DHCP relay is configured by providing the IP address of a DHCP relay server, rather than an IP address range. If both the DHCP relay server and an IP address range are specified, DHCP relay is used, and the specified IP address range is ignored.
Multiple DHCP relay servers can be provided for each LAN. If multiple relay servers are provided, DHCP requests are forwarded to all servers without waiting for a response. Clients will typically use the IP address from the first DHCP response received.
Configuring DHCP relay involves the following items:
Required configuration items
- Disable the DHCP server, if it is enabled.
- IP address of the primary DHCP relay server, to define the relay server that will respond to DHCP requests.
Additional configuration items
- IP address of additional DHCP relay servers.
Web
- Log into Digi Remote Manager, or log into the local Web UI as a user with full Admin access rights.
- Access the device configuration:
 Remote Manager:
- Locate your device as described in Use Digi Remote Manager to view and manage your device.
- Click the Device ID.
- Click Settings.
- Click to expand Config.
Local Web UI:- On the menu, click System. Under Configuration, click Device Configuration.
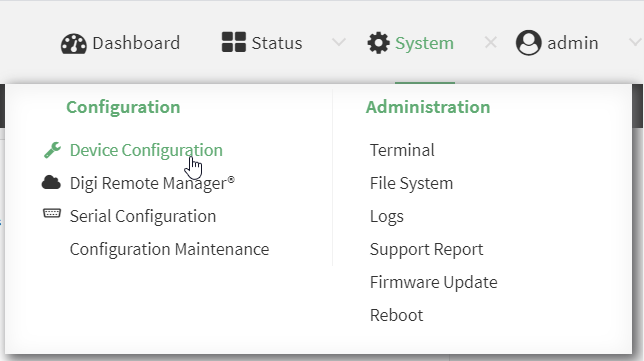
The Configuration window is displayed.
- Click Network > Interfaces.
- Click to expand an existing LAN, or create a new LAN. See
- Disable the DHCP server, if it is enabled:
- Click to expand IPv4 > DHCP server.
- Click Enable to toggle off the DHCP server.
- Click to expand DHCP relay.
- For Add DHCP Server:, click .
- For DHCP server address, type the IP address of the relay server.
- Repeat for each additional DHCP relay server.
- Click Apply to save the configuration and apply the change.
Command line
- Select the device in Remote Manager and click Actions > Open Console, or log into the AnywhereUSB Plus local command line as a user with full Admin access rights.
Depending on your device configuration, you may be presented with an Access selection menu. Type admin to access the Admin CLI.
- At the command line, type config to enter configuration mode:
> config
(config)>
- Add a DHCP relay server to an existing LAN. For example, to add a server to a LAN named my_lan:
(config)> add network interface my_lan ipv4 dhcp_relay end
(config network interface lan1 my_lan dhcp_relay 0)>
See
- Set the IP address of the DHCP relay server:
(config network interface my_lan ipv4 dhcp_relay 0)> address 10.10.10.10
(config network interface my_lan ipv4 dhcp_relay 0)>
- (Optional) Add additional DHCP relay servers:
- Move back one step in the configuration schema by typing two periods (..):
(config network interface my_lan ipv4 dhcp_relay 0)> ..
(config network interface my_lan ipv4 dhcp_relay)>
- Add the next server:
(config network interface lan1 ipv4 dhcp_relay)> add end
(config network interface lan1 ipv4 dhcp_relay 1)>
- Set the IP address of the DHCP relay server:
(config network interface my_lan ipv4 dhcp_relay 1)> address 10.10.10.11
(config network interface my_lan ipv4 dhcp_relay 1)>
- Repeat for each additional relay server.
- Move back one step in the configuration schema by typing two periods (..):
- Disable the DHCP server, if it is enabled:
(config network interface my_lan ipv4 dhcp_relay 1)> .. .. dhcp_server enable false
(config network interface my_lan ipv4 dhcp_relay 1)>
- Save the configuration and apply the change.
(config network interface lan1 ipv4 dhcp_relay 1)> save Configuration saved. > - Type exit to exit the Admin CLI.
Depending on your device configuration, you may be presented with an Access selection menu. Type quit to disconnect from the device.
 PDF
PDF


