MQTT is a lightweight publish/subscribe messaging protocol for the Internet of Things (IoT) applications, designed to connect devices using a small footprint and minimum network bandwidth.
Your TX64 device includes an MQTT broker service that serves as an intermediary between MQTT clients. The broker receives and distributes client messages.
Required configuration items
- Enable the MQTT broker.
- MQTT client usernames and passwords.
- Topic access control for each client.
- Encryption type.
- How to control client access to topics on the MQTT broker.
Additional configuration Items
- The port used by the MQTT broker.
-
Access control list to limit downstream access to the TX64 device's MQTT broker.
-
Include debug messages in the system log.
- Whether to allow anonymous clients.
- Whether to allow clients that have no client ID to connect.
- Whether replace the client's ID with its username.
Web
- Log into Digi Remote Manager, or log into the local Web UI as a user with full Admin access rights.
- Access the device configuration:
 Remote Manager:
- Locate your device as described in Use Digi Remote Manager to view and manage your device.
- Click the Device ID.
- Click Settings.
- Click to expand Config.
Local Web UI:- On the menu, click System. Under Configuration, click Device Configuration.

The Configuration window is displayed.
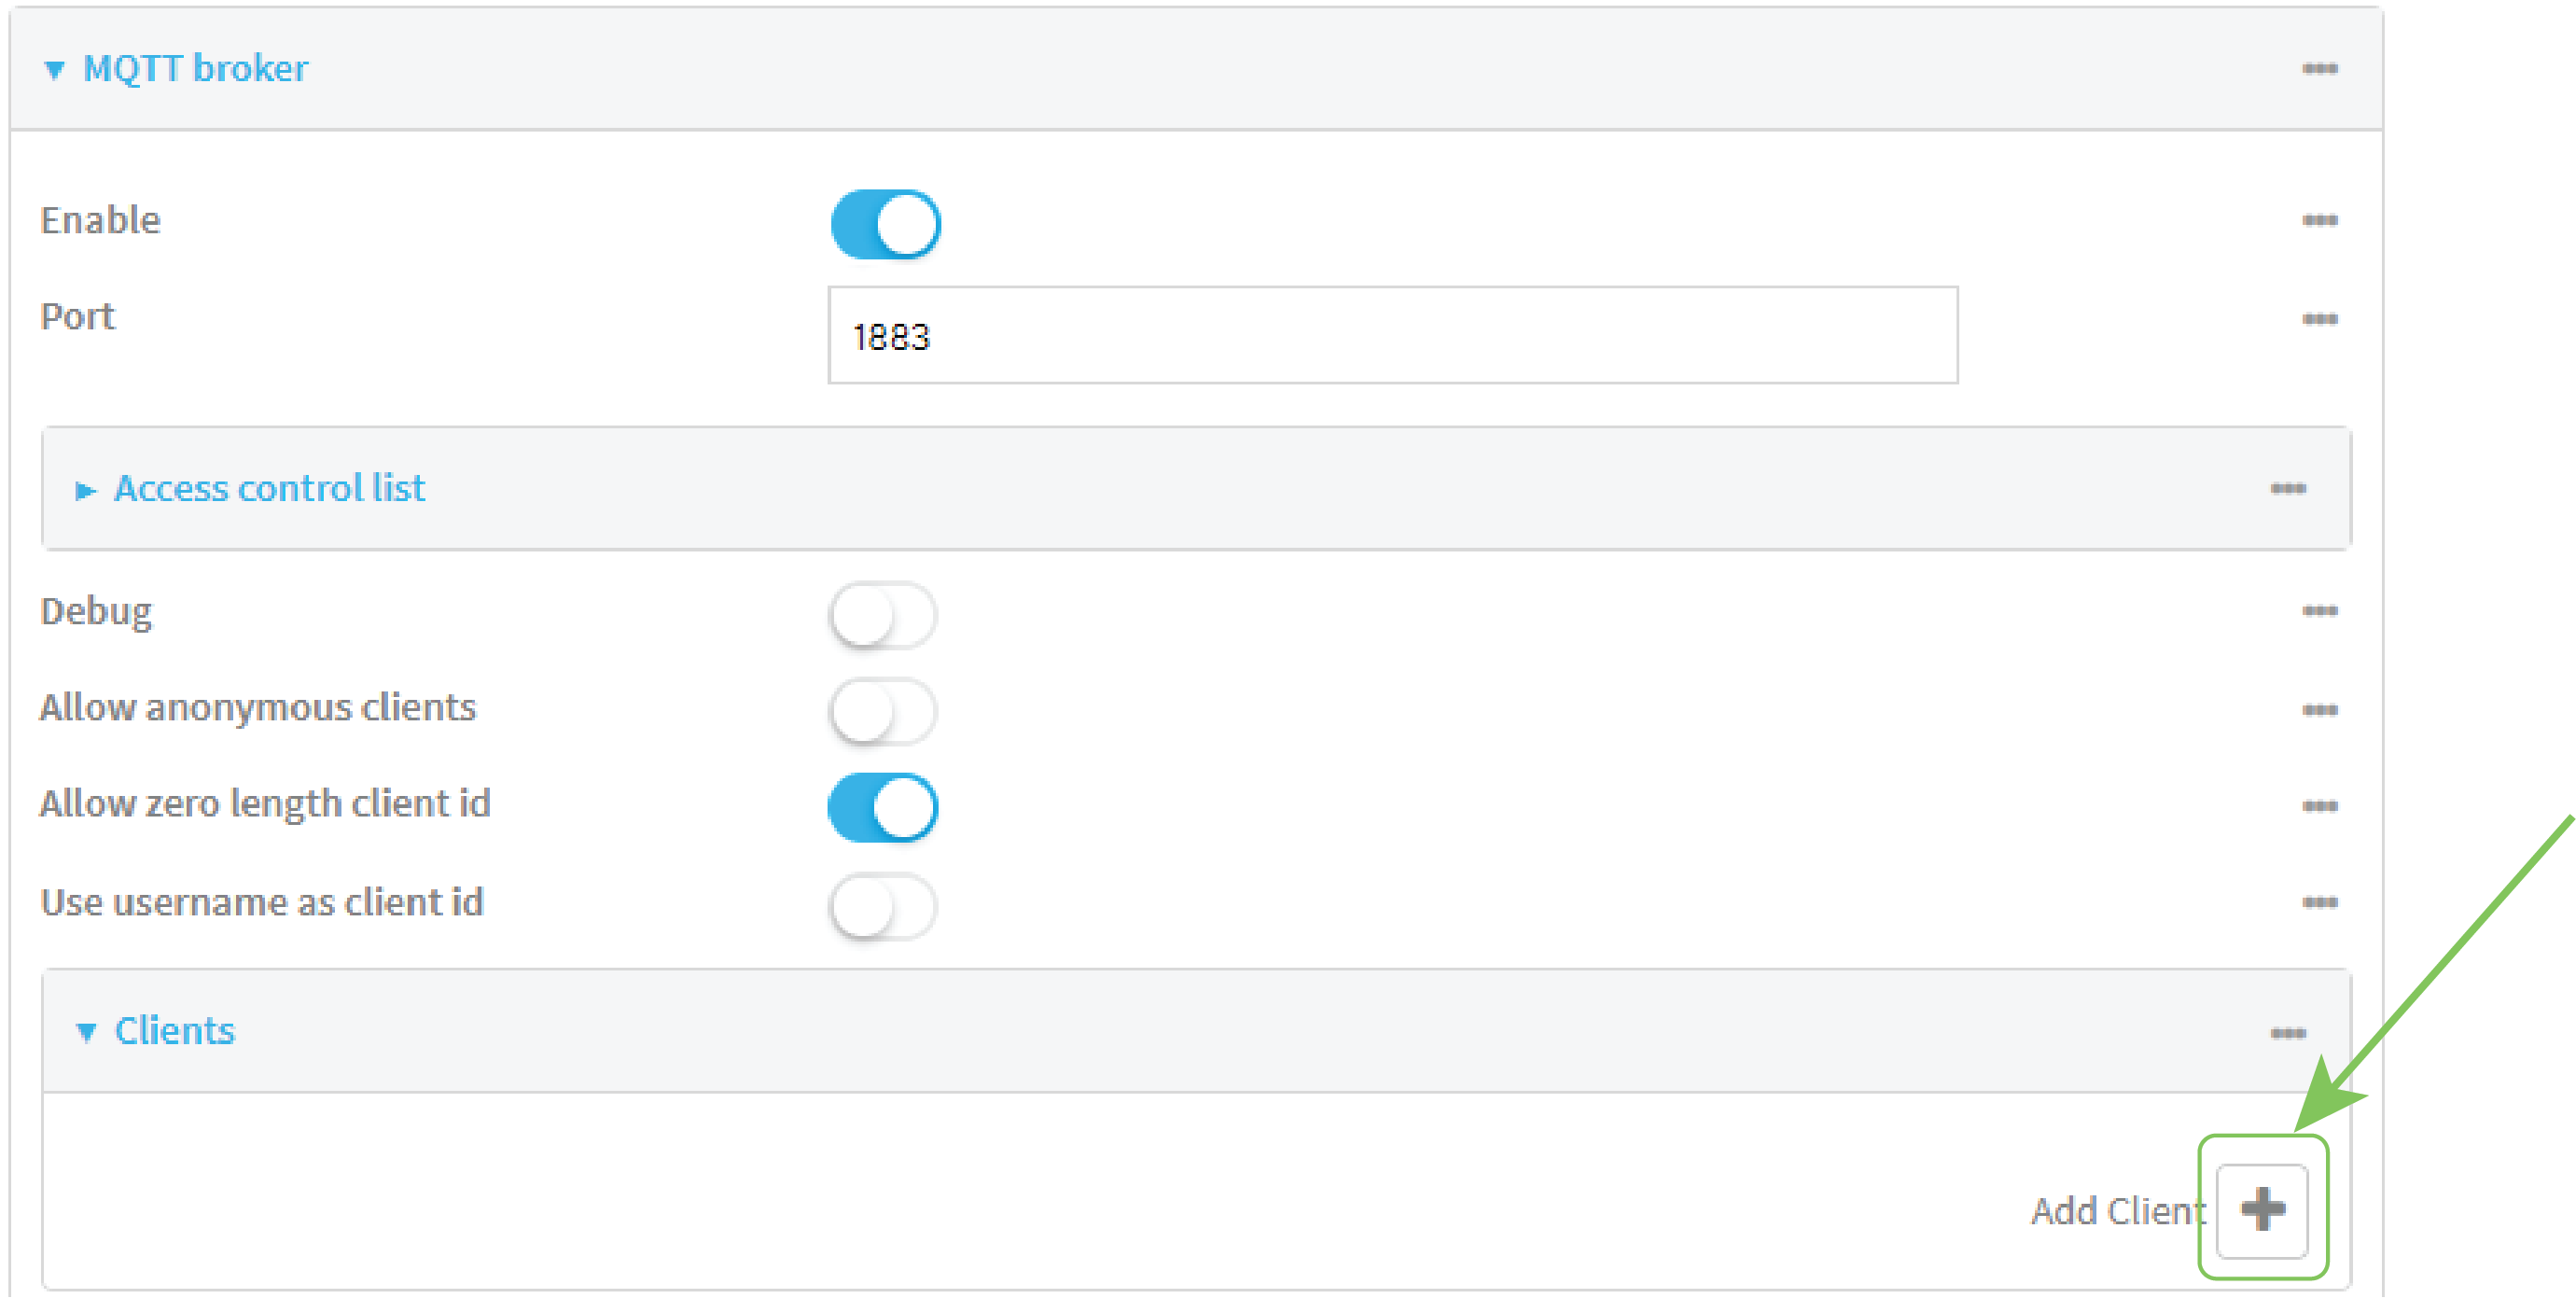
- Click Services > MQTT broker.
- Click Enable.
- (Optional) For Port, type the port number for the MQTT broker to listen for incoming connections. The default is 1883.
-
(Optional) Click to expand Access control list to restrict access to the MQTT broker:
- To limit access to specified IPv4 addresses and networks:
- Click IPv4 Addresses.
- For Add Address, click .
- For Address, enter the IPv4 address or network that can access the device's iperf service. Allowed values are:
- A single IP address or host name.
- A network designation in CIDR notation, for example, 192.168.1.0/24.
- any: No limit to IPv4 addresses that can access the iperf service.
- Click again to list additional IP addresses or networks.
- To limit access to specified IPv6 addresses and networks:
- Click IPv6 Addresses.
- For Add Address, click .
- For Address, enter the IPv6 address or network that can access the device's iperf service. Allowed values are:
- A single IP address or host name.
- A network designation in CIDR notation, for example, 2001:db8::/48.
- any: No limit to IPv6 addresses that can access the iperf service.
- Click again to list additional IP addresses or networks.
- To limit access to hosts connected through a specified interface on the device:
- Click Interfaces.
- For Add Interface, click .
- For Interface, select the appropriate interface from the dropdown.
- Click again to allow access through additional interfaces.
- To limit access based on firewall zones:
- Click Zones. By default, there are three firewall zones already configured: Internal, Edge, and IPsec.
- For Add Zone, click .
- For Zone, select the appropriate firewall zone from the dropdown.
See Firewall configuration for information about firewall zones.
- Click again to allow access through additional firewall zones.
- To limit access to specified IPv4 addresses and networks:
- Click to toggle on Debug to write MQTT debug messages to the system log.
- Click to toggle on Allow anonymous clients to allow connections from clients that do not provide a username.
-
By default, the MQTT broker will allow clients without client IDs to connect, and will generate a client ID for them. To disable, click to toggle off Allow zero length client id.
-
Click to toggle on Use username as client id. When enabled, the broker will replace the client ID with the username, which will prevent one client from disconnecting another by using the same client ID.
-
Add a client:
-
Click to expand Clients.
-
Click to add a client.
-
Type the Username and Password for the client.
-
Add a topic to control this client's access to:
-
Click to expand Topic access control list.
-
Click to add a topic.
-
For Topic, type the topic.
-
For Access, select the level of access that the client will have:
-
Read
-
Write
-
Read/write
-
Deny
-
-
Click again to add additional topics.
-
-
Click again to add additional clients.
-
-
Click to expand Encryption.
-
For Type, select either None or PSK.
-
If PSK is selected:
-
Click to enable Use PSK identity as username to use the PSK identity sent by the client as its username.
-
(Optional) For Identifier, type a string that identifies the listener and is sent to the clients.
-
Click to expand Pre-shared keys.
-
Click to add a pre-shared key.
-
For Identity, type the identity sent to the client.
-
For Key, type or paste the pre-shared key in hexadecimal format that is associated with the client identity.
-
Click again to add additional pre-shared keys.
-
-
-
Click to expand Topic access control list.
The topic access control lists controls what topics clients can access. If no topics are included, then clients have access to all topics. If any topics are listed, access is restricted to only the listed topics.
-
To restrict access for anonymous clients to particular topics:
-
Click to expand Anonymous.
-
Click to add a topic.
-
For Topic, type the topic.
-
For Access, select the level of access that the client will have:
-
Read
-
Write
-
Read/write
-
Deny
-
-
Click again to add additional topics.
-
-
To restrict access to topics based on pattern substitution:
-
Click to expand Pattern.
-
Click to add a topic.
-
For Topic, type the topic.
-
For Access, select the level of access that the client will have:
-
Read
-
Write
-
Read/write
-
Deny
-
-
Click again to add additional topics.
-
-
-
See Information Technology for Public Transport (ITxPT) support for information about configuring the NTP service for ITxPT.
- Click Apply to save the configuration and apply the change.
Command line
- Select the device in Remote Manager and click Actions > Open Console, or log into the TX64 local command line as a user with full Admin access rights.
Depending on your device configuration, you may be presented with an Access selection menu. Type admin to access the Admin CLI.
- At the command line, type config to enter configuration mode:
> config
(config)>
- Enable the MQTT broker:
(config)> service mqtt enable true
(config)>
- (Optional) Set the port number for the MQTT broker to listen for incoming connections:
(config)> service mqtt port int
(config)>
The default is 1883.
-
(Optional) Set the access control list to restrict access to the MQTT broker:
- To limit access to specified IPv4 addresses and networks:
(config)> add service mqtt acl address end value
(config)>
Where value can be:
- A single IP address or host name.
- A network designation in CIDR notation, for example, 192.168.1.0/24.
- any: No limit to IPv4 addresses that can access the iperf service.
Repeat this step to list additional IP addresses or networks.
- To limit access to specified IPv6 addresses and networks:
(config)> add service mqtt acl address6 end value
(config)>
Where value can be:
- A single IP address or host name.
- A network designation in CIDR notation, for example, 2001:db8::/48.
- any: No limit to IPv6 addresses that can access the iperf service.
Repeat this step to list additional IP addresses or networks.
- To limit access to hosts connected through a specified interface on the TX64 device:
(config)> add service mqtt acl interface end value
(config)>
Where value is an interface defined on your device.
Display a list of available interfaces:Use ... network interface ? to display interface information:
(config)> ... network interface ?

Interfaces

Additional Configuration
-------------------------------------------
 setupip              Setup IP
 setuplinklocalip       Setup Link-local IP
 lan1                   LAN1
 loopback               Loopback
 wan1                   WAN1
 wwan1                  WWAN1
 wwan2                  WWAN2

(config)>
Repeat this step to list additional interfaces.
- To limit access based on firewall zones:
(config)> add service mqtt acl zone end value
(config)>
Where value is a firewall zone defined on your device, or the any keyword.
Display a list of available firewall zones:Type ... firewall zone ? at the config prompt:
(config)> ... firewall zone ? Zones: A list of groups of network interfaces that can be referred to by packet filtering rules and access control lists. Additional Configuration ------------------------------------------------------------------------------- any dynamic_routes edge external
Repeat this step to include additional firewall zones.
- To limit access to specified IPv4 addresses and networks:
- Enable the system to write MQTT debug messages to the system log:
(config)> service mqtt debug true
(config)>
- Enable connections from clients that do not provide a username:
(config)> service mqtt allow_anonymous true
(config)>
-
By default, the MQTT broker will allow clients without client IDs to connect, and will generate a client ID for them. To disable:
(config)> service mqtt allow_zero_length_client_id false
(config)>
-
Enable the broker to replace the client ID with the username, which will prevent one client from disconnecting another by using the same client ID:
(config)> service mqtt use_username_as_client_id true
(config)>
-
Add and configure clients that are allowed to connect to the broker:
-
Add a client:
(config)> add service mqtt client end
(config service mqtt client 0)>
-
Set the username and password for the client:
(config service mqtt client 0)> username value
(config service mqtt client 0)> password value
(config service mqtt client 0)>
-
Add a topic to control this client's access to:
-
Add a topic:
(config service mqtt client 0)> add topic_acl end
(config service mqtt client 0 topic_acl 0)>
-
Set the topic:
(config service mqtt client 0 topic_acl 0)> topic value
(config service mqtt client 0 topic_acl 0)>
where value is one of:
- The topic.
- The signal level wildcard, +.
- The multi-level wildcard, #.
-
Set the access type to apply to the topic:
(config service mqtt client 0 topic_acl 0)> access value
(config service mqtt client 0 topic_acl 0)>
where value is one of:
-
deny
-
read
-
readwrite
-
write
The default is readwrite.
-
-
Add additional topics:
(config service mqtt client 0 topic_acl 0)> add .. .. topic_acl end
(config service mqtt client 0 topic_acl 1)>
-
Repeat the above steps to set the topic and access type.
-
-
-
Set the encryption:
-
Return to the root of the configuration:
(config service mqtt client 0 topic_acl 1)> ...
(config)>
-
Set the encryption type:
(config)> service mqtt encryption type value
(config)>
where value is either:
-
none
-
psk
If psk is used:
-
(Optional) Set a string that identifies the listener and is sent to the clients:
(config)> service mqtt encryption identifier string
(config)>
-
Enable the PSK identity sent by the client to be used as its username:
(config)> service mqtt encryption use_identity_as_username true
(config)>
-
Set the pre-shared keys:
Add a pre-shared key:
(config)> add service mqtt encryption psk end
(config service mqtt encryption psk 0)>
Set the identity sent to the client:
(config service mqtt encryption psk 0)> indentity value
(config service mqtt encryption psk 0)>
Set the pre-shared key:
(config service mqtt encryption psk 0)> key value
(config service mqtt encryption psk 0)>
where value is the pre-shared key in hexadecimal format that is associated with the client identity.
Add additional keys:
(config service mqtt encryption psk 0)> add .. end
(config service mqtt encryption psk 1)>
Repeat the above steps to set the identity and the pre-shared key.
-
-
-
The topic access control lists controls what topics clients can access. If no topics are included, then clients have access to all topics. If any topics are listed, access is restricted to only the listed topics.
-
To restrict access for anonymous clients to particular topics:
-
Return to the service mqtt node of the schema:
(config service mqtt encryption psk 1)> ... service mqtt
(config service mqtt)>
-
Add a topic:
(config service mqtt)> add topic_acl anonymous end
(config service mqtt topic_acl anonymous 0)>
-
Set the topic:
(config service mqtt topic_acl anonymous 0)> topic value
(config service mqtt topic_acl anonymous 0)>
where value is one of:
- The topic.
- The signal level wildcard, +.
- The multi-level wildcard, #.
-
Set the access type to apply to the topic:
(config service mqtt topic_acl anonymous 0)> access value
(config service mqtt topic_acl anonymous 0)>
where value is one of:
-
deny
-
read
-
readwrite
-
write
The default is readwrite.
-
-
Add additional topics:
(config service mqtt topic_acl anonymous 0)> add .. .. anonymous end
(config service mqtt topic_acl anonymous 1)>
-
Repeat the above steps to set the topic and access type.
-
-
To restrict access to topics based on pattern substitution:
-
Return to the service mqtt node of the schema:
(config service mqtt encryption psk 1)> ... service mqtt
(config service mqtt)>
-
Add a topic:
(config service mqtt)> add topic_acl pattern end
(config service mqtt topic_acl pattern 0)>
-
Set the topic:
(config service mqtt topic_acl pattern 0)> topic value
(config service mqtt topic_acl pattern 0)>
where value is one of:
- The topic.
- The variable %c as a substitute for the client ID.
- The variable %u as a substitute for the username.
If a variable is used, it can be the only text for that level of the hierarchy.
-
Set the access type to apply to the topic:
(config service mqtt topic_acl pattern 0)> access value
(config service mqtt topic_acl pattern 0)>
where value is one of:
-
deny
-
read
-
readwrite
-
write
The default is readwrite.
-
-
Add additional topics:
(config service mqtt topic_acl pattern 0)> add .. .. pattern end
(config service mqtt topic_acl pattern 1)>
-
Repeat the above steps to set the topic and access type.
-
-
- Save the configuration and apply the change.
(config)> save Configuration saved. > - Type exit to exit the Admin CLI.
Depending on your device configuration, you may be presented with an Access selection menu. Type quit to disconnect from the device.
 PDF
PDF


