Remote Power Management Demo
Purpose
This page is to introduce you in the Demo of the Remote Power Management Interface using a Python generated web page on a Connect Port X.
Requirements
- Connect Port X (CPX)
- Digi RPM device (RPM 8 and 10 supported)
- SMTP server
- Wall Router
- Watchport Camera
Introduction
The Demo configuration is shown below:

The standard Python smtplib.py is compatible with CPX devices with the exception of one function call 'getfqdn()'. In the Digi compliant version, this call is replaced by a custom function call 'get_host()'. The 'get_host()' call returns the hostname of the device using the digicli [link needed] library.
Files
We are using a couple of techniques in this demo, so it´s clear that we need a couple of source. You have to add the following Python files using the ConnectPort X web interface:
- config.xml
- DigiXBeeDrivers.zip
- HttpDrivers.zip
- PythonExt.zip
- ngg_main.py
- sharing.py
- NGGAux.zip
- Python.zip
- xml.zip
- zigbee.py
Getting started
- At first you have to adjust the config file settings according to your needs.
- WALL_ROUTER_ENABLED: Set to 1 if the website should check sensor data from a wall router (specified in WallRouterAddress).
- PAGE_REFRESH: Adjust the period of the web site auto refresh (in seconds)
- ALERT_EMAIL_FROM: Set the "from" field of the alert email
- ALERT_EMAIL_TO: Set the destination email address
- SMTP_SERVER: Set the SMTP server host name
- TEMPERATURE_THRESHOLD_HIGH: An alert email is sent if the wall router temperature sensor value is above this threshold.
- TEMPERATURE_THRESHOLD_LOW: An alert email is sent if the wall router temperature sensor value is below this threshold.
- LIGHT_THRESHOLD_HIGH: An alert email is sent if the wall router light sensor value is above this threshold.
- LIGHT_THRESHOLD_LOW: An alert email is sent if the wall router light sensor value is below this threshold.
- DiagnosticsPagePort: Set the port on which the web page is accessible.
- WallRouterAddress: Set the 64 bit destination address of the wall router (format: [XX:XX:XX:XX:XX:XX:XX:XX]!)
- User: Set the username for access to the web page
- Password: Set the password
- The Wall Router destination address is the same as its serial number. You can find that value on the device´s cover.
- Check if your CPX device can connect to the Wall Router. Using the web interface, Configuration->XBee Network should contain an according entry. If not, press the reset button of the wall router quickly 4 times. It then should re-associate with the CPX.
- Then, upload all files specified above on the CPX device.
- Add an auto-start slot at the CPX configuration page (Applications->Python->Auto-start Settings) for "sharing.py".
- Reboot the device.
- If you wish to name your RPM outlets, open a serial connection from the CPX to the RPM device by typing "connect 1" on the command line interface. If everything worked fine, you will see the prompt "RPM>:". Type "name 0 X,Y" where X is the outlet id and Y is the name you whish to specify.
- If you are experiencing problems on connecting to the RPM, type "set term state=off" and reboot the CPX.
- Telnet and run "py ngg_main.py" to start the web server manually.
- If the web server should start up automatically, please use a second auto-start slot (Applications->Python->Auto-start Settings). But be aware: You get no debug information from the console.
- Wait about a minute and type in your browser "http://<CPX-IP>:8080".
- To authenticate, add "?user=admin&password=secret" to the URL and enter (for example, http://<CPX-IP>:8080/?user=admin&password=secret).
- To logout, add "?logout=." to the URL and press Enter.
Please note: There is no session timeout, so don´t forget to logout!
How it works / how it looks
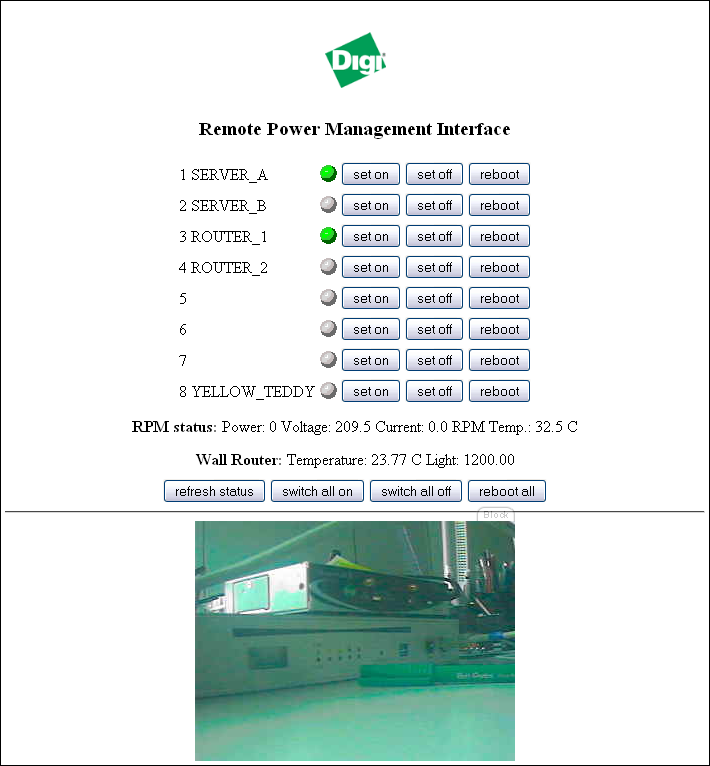
ngg_main.py serves a web page that gives you the opportunity to manage the connected RPM. You are able to
- Monitor the state of each outlet
- Set on/off a specific outlet
- Reboot a specific outlet (automatically reset the outlet within 10 seconds)
- Set on/off all outlets
- Reboot all outlets
- Monitor the Wall Router sensor values
- Have a look at the camera video
- Use basic authentication to limit access to the web page (see hints on the "Getting started" section).
As a big feature, you are getting an alert E-Mail if the Wall Router sensor values are out of the range specified in the config file.
Here is a screenshot of the Remote Power Management Interface:
Interesting code
Below, we will give a short introduction in the key source code.
Sending an E-Mail is quite simple. Here is a snippet from email.py:
def sendEmail(fromaddr, toaddrs, subject, msg):

    ## Define Header
    header = ("From: %s\r\nTo: %s\r\nSubject: %s\r\n"
      % (fromaddr, toaddrs, subject))
    msg = header + msg
    server = smtplib_digi.SMTP(smtp_server)
    server.set_debuglevel(1)
    server.sendmail(fromaddr, toaddrs, msg)
    server.quit()
Tip You can get a simple SMTP Server for Win32 that is free for non-commercial use at [1].
Retrieving the Wall Router sensor values is easy, too. Have a look at wallrouter.py:
def getDataSample():
    ## Create a sensor object
    wallrouter = xbeewr.XBeeWRN(DESTINATION)

    ## Retrieve a sample reading from the wallrouter
    sample = wallrouter.sample()

    return (sample['temperature'], sample['light'])
Communicating with the RPM is gained using the serial port. Here is an example from rpm.py:
def getStatus(rpmId):
    serialfd = openConsole()
    os.write(serialfd, "status %d\x0D" % rpmId)
    time.sleep(2)
    data = os.read(serialfd, 2048)
    os.close(serialfd)
    return data

def openConsole():
    # Open serial port
    serialfd = os.open(serialport, os.O_RDWR)
    os.write(serialfd, "\x0D")
    time.sleep(0.1)
    data = os.read(serialfd, 1024)
    return serialfd
Starting the web server is a bit more difficult. Please look at this snippet of ngg_main.py:
WebServerThread = Thread(group=None, target=WebServerThreadFunction, name="Web Server Thread", args=(), kwargs={})
WebServerThread.start()

def WebServerThreadFunction():
    lastpage = "Error."
    server = SimpleHTTPServer.BaseHTTPServer.HTTPServer(
                ('', HTTP_PORT), MyHTTPRequestHandler)
    print "Serving HTTP Requests at port ", HTTP_PORT
    server.serve_forever()

class MyHTTPRequestHandler(SimpleHTTPServer.SimpleHTTPRequestHandler):

    def do_GET(self):
        global lastpage
        parameters = {}
        try:
            parameters = dict(
                [ map(lambda s: urllib.unquote(s), pair.split('=')) \
                    for pair in urlparse.urlparse(self.path)[4].split('&')])
        except:
            pass

        s = WEB_do_GET(parameters)
        if (s!="Error"):
            lastpage = s
            self.wfile.write(s)
        else:
            self.wfile.write(lastpage)
WEB_do_GET is responsible for generating the HTML code and handling actions. At first it checks if some buttons have been pressed and according actions have to be done:
def WEB_do_GET(parameters):

    # Perform action
    if 'action' in parameters:
        if parameters['action'].startswith('setOn'):
            outletId = parameters['action'].split('setOn')[1]
            setOutlet(0, outletId, 'on')
        elif # and so on...
After that, the RPM status and Wall Router values are being retrieved using the modules described above.
Having that values in mind, we are able to generate a string template and fill it properly. The template is stored in NGGAux.zip.
s = Template(ngg_main_webpage)
s = s.safe_substitute(REFRESH=PAGE_REFRESH,
                IP_ADDRESS=ipaddress,
                PORT=HTTP_PORT,
                # [...]
                )
return s
Monitoring the Wall Router sensor values periodically is done by the main loop:
while True:
        # [...]
        time.sleep(10)
        # check if th Wall Router is enabled (as defined in config.xml)
        if (WALL_ROUTER_ENABLED==1):
            try:
                # get Wall Router sensor data
                sample = getDataSample()
            except:
                print "Error getting data sample from Wall router."
        continue
            try:
                # check sensor data and send an Email if neccessary
                if (not temperature_alerted) and (not TEMPERATURE_THRESHOLD_LOW<=sample[0]<=TEMPERATURE_THRESHOLD_HIGH):
                    print "Temperature alert! "
                    alertcounter = alertcounter + 1
                    msg = "\r\n" + "Temperature is bad:\r\n\r\n" + str(sample[0]) + "(C)\r\n\r\n" \
                         "\r\n\r\n\r\n" + "This is alarm number " + str(alertcounter) + " since start of the monitoring script."
                    sendEmail(ALERT_EMAIL_FROM, ALERT_EMAIL_TO, "Digi Sensor Alert!", msg)
                    temperature_alerted = True
                elif (TEMPERATURE_THRESHOLD_LOW<=sample[0]<=TEMPERATURE_THRESHOLD_HIGH):
                    temperature_alerted = False
                #
                # [...] doing the same for the light sensor value...
                #
            except:
                print "Error sending alert E-Mail."
Future Versions
There are no recent changes scheduled so far.
Troubleshooting
In some installations it can occur, that the connection between the CPX and the RPM device cannot be established. In these cases, just remove the power plug of the RPM for some seconds and replug it. Maybe a reboot of the CPX should necessary, too.
Warning:
There is no protocol for the communication between the CPX and the RPM device. This demo uses a parsing algorithm to retrieve the information in the RPM status message. However, if the status message syntax changes due to product/firmware updates in the future, the parsing algorithm has to be adapted acordingly.
Source
The next archive contains some files that have to be uploaded unpacked on the ConnectPort X.
 PDF
PDF


