Motion Detection with XBee
How to cub-class a DIA driver.
This page covers how to leverage an existing DIA driver without modifying the original file.
Motion detector example
In this example, I wish to connect a common Motion-Detector/Glass-Break device with relay contacts ('dry-contacts') via ZigBee to Device Cloud and DIA.
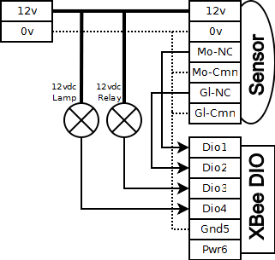
The motion-detector sensor requires 12vdc to run, so I used an older XBee DIO Adapter which runs on 9-30vdc. With a 12vdc supply, the entire setup can be powered including directly driving 12vdc relays and 12vdc low-voltage garden-style lighting.
Technically, the existing DIA DIO driver could be used to read the sensor contacts and drive the lamp output, however the motion detection event is very short-lived. It may be true for only a few seconds, and turning on a lamp for a few seconds is not what is required. Instead, a timer is required to turn the lamp on for a few minutes. In theory one could use the DIA transforms to do this, but at present they are stateless, so cannot function as timers.
So one has two choices:
- Clone and rename the existing DIA DIO driver, and modify it directly.
- Create a new subclass of the existing DIA DIO driver which adds the new functionality.
In this demo example I chose to subclass. The new driver allows the existing DIO driver to manage incoming data and update the standard DIO data channels. Then it reads the input channels and adjusts the output channels as required.
Ideally, the time the lamp is held on should be a setting, which complicates the subclass slightly. That is left for a future TODO - including the support for the glass-break input and the 12vdc relay to drive brighter AC lights. If all goes well, my final design will have a programmable XBee to manage the light and relay control locally within the XBee adapter itself.
Hardware example
Wiring the system is quite strait forward. The items required:
- XBee Digital I/O Adapter preferably with 9-30vdc supply, but if you have a 3-6 vdc model, buy a PCB to step-down 12 vdc to 5 vdc. For example, ebay seller electronics-salon sells a nice assembled model for us$10 which I have used on several projects.
- Any 12 vdc supply large enough to power everything - anything larger than 1.5 Amp should be okay. As is, the 10-watt halogen garden lamp (at about 0.8 A) is the most power-hungry device.
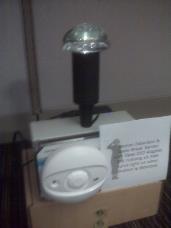
- Motion Sensor, such as Bravo BV-500GB by DSC, sold by smarthome.com
- 12 vdc Low-Voltage Lamp, such as the Malibu brand in the image, purchased from Home Depo. Once the halogen lamp fails, they are easy to replace with LED versions from superbrightleds.com
- 12 vdc Power Relay with AC-rated contacts, such as Omron LY1F-DC12 from digikey.com which is rated at 15 Amp @ 110 vac. It requires 75m A @ 12 vdc to operate.
Notes
- The 12 vdc power ground link to the XBee DIO Adapter is optional if the XBee DIO Adapter is powered by the 12 vdc supply, but it is required if the XBee DIO Adapter is powered by (for example) the 5vdc wall-wart Digi will supply if you buy the 3-6 vdc XBee DIO Adapter
- The four DIO terminals of the XBee DIO Adapter when used as outputs can only sink current, so pull the 12 vdc low. That is why both the lamp and relay are tied to 12 vdc, with the XBee DIO Adapter acting as ground.
- The power-output (t erminal #6) of the XBee DIO Adapter can only supply 50 mA @ 12 vdc, which is not enough for either the landscape lamp or the power relay. However, it would be enough for direct LED lights or a smaller reed-relay which could power a larger lamp or relay. Moving an 'output' to this terminal would free up one of the XBee adapter IO for use as another input, such as a tamper contact, or perhaps even a sensor to detect if the lamp is really on and emitting light.
- The reason for having both a dim 12 vdc lamp and bright 120 vac lamp (via 12 vdc relay) is I plan to use the dim 12vdc lamp more as a night-light then as security. So based on time of day, sunlight level, and whether the security level is 'we are home' or 'we are out', either or neither lamp may be lit due to motion.
- XBee DIO Adapter DIP Switch settings: 2, 3, and 4 are on.
- For inputs, only terminals 1 & 2 have internal pull-up. To use terminals 3 & 4 as input, you may need to use resisters (for example 10K ohm) to pull the inputs up to 12vdc when floating/open.
YML code
This is just the fragment required for the custom DIO driver. We desire the DIO adapter to fresh the channel status every 30 seconds, plus the channels will be updated any time they change. The four IO are assigned like this:
- Channel 1 input is the Motion-Detect NC/normally-closed contact - it opens when motion is seen.
- Channel 2 input is the Glass-Break NC/normally-closed contact - it opens when the distinctive sound of break glass is heard. This input is for future use, and is ignored now.
- Channel 3 output is reserved for a 12 vdc relay which can drive 120 vac lamps, which would be appropriate for yard or full-room lights.
- Channel 4 output directly drives a 12 vdc garden-style lamp, which is used for demo purposes and night-lighting.
  - name: motion
    driver: devices.experimental.xbee_motion:XBeeMotion
    settings:
        xbee_device_manager: xbee_device_manager
        extended_address: "00:13:a2:00:40:33:4e:a9!"
        sample_rate_ms: 30000
        sleep: False
        power: Off
        channel1_dir: "In"
        channel2_dir: "In"
        channel3_dir: "Out"
        channel4_dir: "Out"
Source code
Here is the entire custom file. Since it uses the normal XBee DIO driver, there is little function required. Basically, this driver allows the XBee DIO driver to process the incoming data, then compares the Motion-Detect input to the current light state.
import traceback
import time

from devices.device_base import DeviceBase
from devices.xbee.xbee_devices.xbee_base import XBeeBase
from settings.settings_base import SettingsBase, Setting

from devices.xbee.xbee_devices.xbee_dio import *

class XBeeMotion(XBeeDIO):

    OFF_DELAY = 30

    def __init__(self, name, core_services):

        ## Initialize the base class
        XBeeDIO.__init__(self, name, core_services)

        # zero means off, else holds time.time turned on
        self.__light_on = 0

        return

    ## Locally defined functions:
    def sample_indication(self, buf, addr, force=False):

        ## allow base class to process data message
        XBeeDIO.sample_indication(self, buf, addr, force)

        # then do our reaction to the status
        now = time.time()

        motion = self.property_get( 'channel1_input').value
        if motion:
            if self.__light_on == 0:
                print 'Motion Seen, turning light on'
                self.set_output(Sample(now, True, "On"), 3)

            # else: print 'Motion Seen, light already on'

            # in all cases, bump light_on time to now
            self.__light_on = now

      else:
            # else no motion
            if self.__light_on != 0:
                # then light is on
                if (now - self.__light_on) > self.OFF_DELAY:
                    print 'No Motion, turning light off'
                    self.set_output(Sample(now, False, "Off"), 3)
                    self.__light_on = 0

                # else: print 'No Motion Seen, light is on, should stay on'

      return
 PDF
PDF


