Update the Telit modem firmware using the XFP utility
You can update the Telit
Note To update the Telit modem firmware on the XBee 3 Cellular Cat 1 device you must use USB Direct mode. USB Direct mode requires that you use either a Digi XBIB-CU-TH development board or your own hardware that makes a USB port available to a PC.
Requirements
Hardware
- XBee 3 Cellular Cat 1 device
- Digi XBIB-CU-TH development board, or your own hardware design that makes a USB port available to a PC
- If using XBIB-CU-TH:
- USB Type-C cable to communicate with XBee UART
- USB micro-B cable to connect to USB Direct port
- If using your own hardware:
- External power supply
- USB cable as necessary to communicate with XBee USB Direct port
- If using XBIB-CU-TH:
Software
- Windows PC
- Digi XCTU utility
- Telit USB driver
- To get this file for Windows 10, navigate to the Digi XBee Cellular LTE CAT 1 firmware page and click Telit Drivers for Windows 10 to download the file.
- To get this file for a Windows version earlier to version 10, navigate to the Digi XBee Cellular LTE CAT 1 firmware page and click Telit Drivers for Windows <10 to download the file.
-
XFP installation files
To get this file, navigate to the Digi XBee Cellular LTE CAT 1 firmware page and click Telit xfp Utility for Windows to download the file.
- Telit firmware file: generic_stream_LE866A1-NA_23.00.306.bin
To get this file, navigate to the Digi XBee Cellular LTE CAT 1 firmware page and click Telit Firmware Image 23.00.306 to download the file.
Update the firmware
- Install the Telit USB driver.
- Determine your Windows version.
- Navigate to the Digi XBee Cellular LTE CAT 1 firmware page.
- If you have Windows 10, click Telit Drivers for Windows 10 to download the device driver file.
- If you have a version earlier than Windows 10, click Telit Drivers for Windows <10 to download the file.
- Click the downloaded file to install it.
- Install the XFP utility.
- Navigate to the Digi XBee Cellular LTE CAT 1 firmware page.
- Click Telit xfp Utility for Windows to download the file.
- Click the downloaded file to install it.
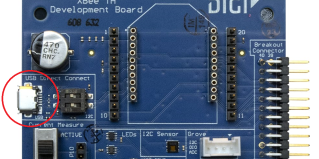
- Ensure that the USB Direct Connect switches are in the correct position.
Near the upper-left corner of the development board, there is a pair of DIP switches labeled USB Direct Connect. Both switches should point to the left, in the position closest to the USB micro-B port on the edge of the development board.

- Configure the device for USB Direct access.
Connect the USB Type-C cable to the USB port on the bottom edge of the development board.
- Add and configure the device in XCTU.
- Open XCTU.
- Add the device to XCTU.
- Click the Configuration working mode button.
Scroll down to the I/O Settings section, and find the P1 DIO11 option. Ensure that it is set to USB direct [7]. Click the Write button if you needed to change the setting.
- Use USB Direct access to communicate with the Telit modem.
Connect the USB micro-B cable to the USB Direct Connect port on the development board. If this is the first time using USB Direct, a Windows message appears: "Installing device driver software".

- Wait for the driver installation to complete.
After installation of the first driver is completed, reset the device with the Reset button, and wait for the installation of the second driver to complete. If the driver fails, note that it was installed but the bootloader disappeared after loading the application.
- Update the XBee 3 Cellular modem firmware.
- Navigate to the Digi XBee Cellular LTE CAT 1 firmware page.
- Click Telit Firmware Image 23.00.306 to download the file.
- Run the Telit XFP program on the PC.
- Click OK to dismiss the first dialog box. The Xfp dialog displays.
- From the Port drop-down box, select USB.
- Click Browse to find and select the Telit modem firmware image: generic_stream_LE866A1-NA_23.00.306.bin
- Click Program. The progress bar starts flashing.
- Press the Reset button on the XBIB-CU-TH development board. If you are using your own hardware, reset the XBee 3 Cellular device.
- The XBee 3 Cellular modem firmware update begins.
- When the update completes, the Program Complete dialog displays.
- Disable USB Direct access in XCTU.
- Open XCTU.
- Click the Configuration working mode button.
- Click the Write button to change the setting.
- Scroll down to the I/O Settings section, and find the P1 DIO11 option.
- Set the P1 DIO11 option back to the desired setting. The default value is Disabled [0].


 PDF
PDF


