Assemble the device
Before you begin, make sure you have the following required equipment to assemble the Connect Tank device:
- One 9/64-inch or 3.5 mm hex key
- Activated SIM card: See Activate a SIM card
CAUTION! This product contains a lithium metal battery. Prior to installation, the battery should be inspected for any signs of damage. If the battery appears to be damaged or is dropped during the installation, do not use the battery and dispose of it properly. See Battery inspection for more information.
To assemble the device:
- Use a 9/64-inch or 3.5 mm hex key to loosen the four retaining screws and open the Connect Tank enclosure cover.

-
Insert the activated SIM card.
- Orient Connect Tank to match the picture below.

-
Unlock the SIM card tray by gently pushing the metal bar toward the bottom of the tray.
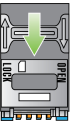
- Open the SIM card tray by pulling the tray up from the top or right side of the tray.
CAUTION! Do not pull the SIM card tray up from the left side or use a tool to open the tray. These actions may damage the SIM detect switch, which is beneath the left side of the tray.
-
Insert the SIM card into the SIM card tray, with the metal contacts face-down and the flat edge inserted into the holder.

- Press the SIM card tray onto the board.
- Lock the SIM card tray by gently pushing the metal bar toward the top of the SIM card holder.

- Place the battery in the battery holder. Make sure that the wiring attached to the top of the battery is NOT placed in the battery holder, as shown below.
-
Connect the wiring to the battery port on the circuit board.

-
(Optional) If your tank has a 2-inch NPT threaded opening, you can attach a 1-inch to 2-inch adapter to the bottom of the device.
Note If you are using a 2-inch NPT adapter, you should only use the adapter available through Digi International (part number 76000910). This adapter has been modified specifically to not cause reflections of the ultrasonic signal. Standard 2-inch NPT adapters will interfere with the ultrasonic signal and cause incorrect tank level readings.

-
If this is the first time you are assembling the device, complete initial configuration using the CLI. For more information, see Initial Connect Tank configuration. If initial configuration has been completed, you can skip this step.
- Reassemble the device.
- Place the enclosure cover onto the base. To ensure that a gap does not appear between the cover and the base:
- The green dots on the cover and the base must both be on the same side of the device, as shown below.
- Make sure that the battery holder in the cover aligns with the battery holder in the base.

- Verify that an adequate seal is present between the cover and the base.
- Tighten the screws
- Place the enclosure cover onto the base. To ensure that a gap does not appear between the cover and the base:
CAUTION! Cover screws are required as part of the safety rating. When tightening the cover screws, use a screw torque of 0.79 to 1.92 newton meters (7 to 17 inch pounds).
 PDF
PDF


