Introduction
Digi released properly signed (WHQL program) drivers for Windows 7 and 8.1 for this product. Microsoft has since released security updates to this OS that have disabled many third party drivers from being installed even when they are properly signed.
Unfortunately, the issue is due to a change in the Operating System and Digi is unable to address this with a driver fix.
Below are two possible workarounds to install drivers on these Operating System.
- One is to install the driver into a non-updated Windows 7 or 8.1 system (or only with pre 2014 Microsoft updates)
- The other is to temporarily disable the driver signing mechanism as described below while installing this driver.
As of November 2024, this issue does not affect Windows 10 or Windows 11, or Windows Server versions that are noted as supported with this driver).
Solution
Below are several ways to disable the driver signing mechanism in Microsoft Windows.
Only one of these options should be followed.
How to disable driver signature enforcement temporarily.
If you want to disable driver signature enforcement temporarily, follow the instructions below.
- Click Restart from the Start menu and hold down the Shift key on your keyboard at the same time.
- Once the computer has rebooted, choose the Troubleshoot option when a new window pops up and then choose Advanced options > Startup Settings.
- Click the Restart button to restart your computer one last time to modify boot time configuration settings.
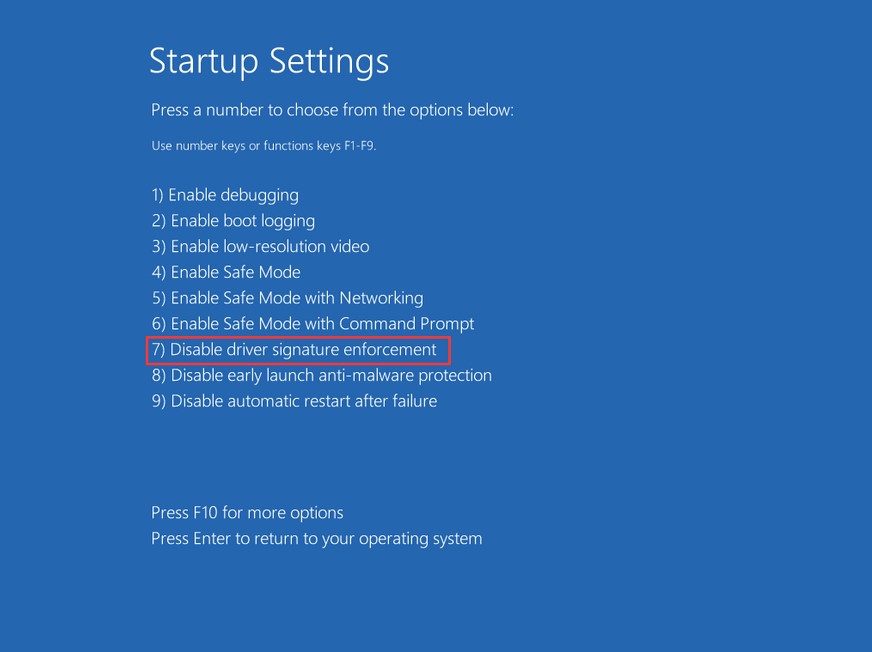
- A list of options will show up. Press F7 on your keyboard to choose Disable driver signature enforcement.

After finishing all the steps above, your PC will restart and driver signature enforcement should be disabled. You should now be able to install unsigned drivers without any error messages.
Since this method only disables driver signature enforcement temporarily, make sure to install any other unsigned drivers needed before rebooting.
Disable Driver Signing Code with Local Group Policy Editor.
Another method that can be used to disable driver signature enforcement temporarily is to use Local Group Policy Editor, to use this method, follow the steps below.
- Press the Windows key + R key at the same time to open the Run dialog box. Next, type gpedit.msc in the Run box and press Enter to open Local Group Policy Editor.
- Once in the Local Group Policy Editor window, navigate to User Configuration > Administrative Templates > System > Driver Installation from the left panel.
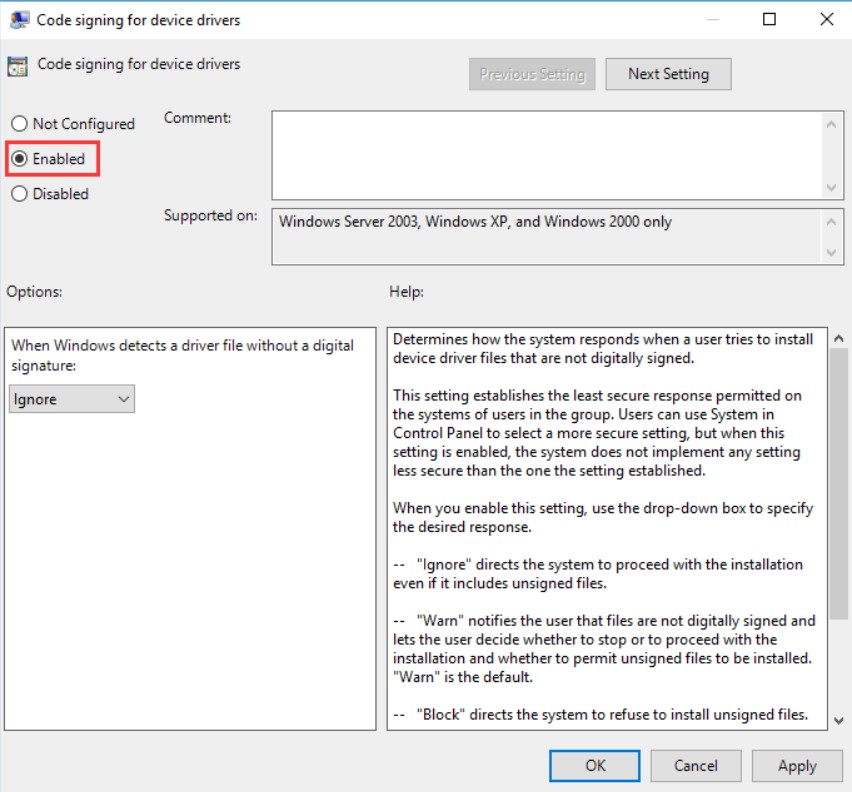
- Right-click the Code signing for device drivers entry and then select Edit.
- Now check Enabled and then choose Ignore from the drop-down list under Options.

- Click OK and then click Apply to perform all the changes.
- Restart your Windows system in the end.
After finishing all the steps above, driver signature enforcement should be disabled. You should now be able to install unsigned drivers without any error messages.
Enable Windows Test Signing Mode
Another option available, if you do not want to disable driver signing permanently is to put Microsoft Windows in "Test mode" which allows for unsigned drivers to be installed. To use this method, follow the steps below.
- Type cmd in the Search bar, right-click Command Prompt and then choose Run as administrator to open it with administrator privileges.
- Type the command: bcdedit /set testsigning on and then press Enter to run the command.
- Close the Command Prompt window and restart your computer.
After finishing all the steps above, driver signature enforcement should be disabled. You should now be able to install unsigned drivers without any error messages.
- Remember to revert the above to get back to "standard" Windows mode after the installation of unsigned drivers are done.
How to Disable Driver Signature Enforcement Permanently with Command Prompt
To disable driver signature enforcement permanently, you can follow the instructions below.
- Type cmd in the Search bar, right-click Command Prompt and then choose Run as administrator to open it with administrator privileges.
- Type the command: bcdedit.exe /set nointegritychecks on and then press Enter to run the command.
- Close the Command Prompt window and restart your computer.
- In order to disable driver signature enforcement, you can also try to run these two commands:
bcdedit.exe -set loadoptions DISABLE_INTEGRITY_CHECKS
bcdedit.exe -set TESTSIGNING ON
After finishing all the steps above, driver signature enforcement should be disabled. You should now be able to install unsigned drivers without any error messages.
How to Enable Driver Signature Enforcement
The below steps are to re-enable driver signature enforcement if they were disabled using the permanent solution.
- Open Command Prompt as administrator again by following the instructions mentioned above.
- Once the Command Prompt window is opened, enter cdedit.exe /set nointegritychecks off and then press Enter to execute this command.
- Close the Command Prompt window and restart your computer.
- Alternatively, you can also enter the following lines:
bcdedit -set loadoptions ENABLE_INTEGRITY_CHECKS
bcdedit -set TESTSIGNING OFF
Driver signature enforcement should now be re-enabled.
Last updated:
Nov 28, 2024