What are Digi Containers?
Digi Containers Service is an add-on service that simplifies and centralizes the process of building, deploying and running custom applications on devices managed with Digi Remote Manager® (Digi RM). With a Digi RM license and Digi Containers, you deploy containerized programs or Python applications at scale and on any device running DAL OS.
Implemented via Lightweight Linux Containers (LXC), Digi Container Service makes the process portable, scalable, secure, fast and efficient. Digi empowers companies to orchestrate and manage a complex series of containers in various structures and configurations across enterprise, industrial, transportation and other use cases.
Digi Containers Product Page
Digi Containers Datasheet
What is Atsign sshnoports?
Atsign’s sshnoports is a software-based solution that provides remote connectivity to IoT equipment without requiring VPN setups, routable IP addresses, or open ports on the devices.
https://atsign.com/
https://www.noports.com/
The Atsign sshnoports architecture leverages a control plane where each IoT device registers itself with a unique “atsign”. Once registered, each device can specify which other atsigns it can establish connections to or which atsigns can establish connections to it.
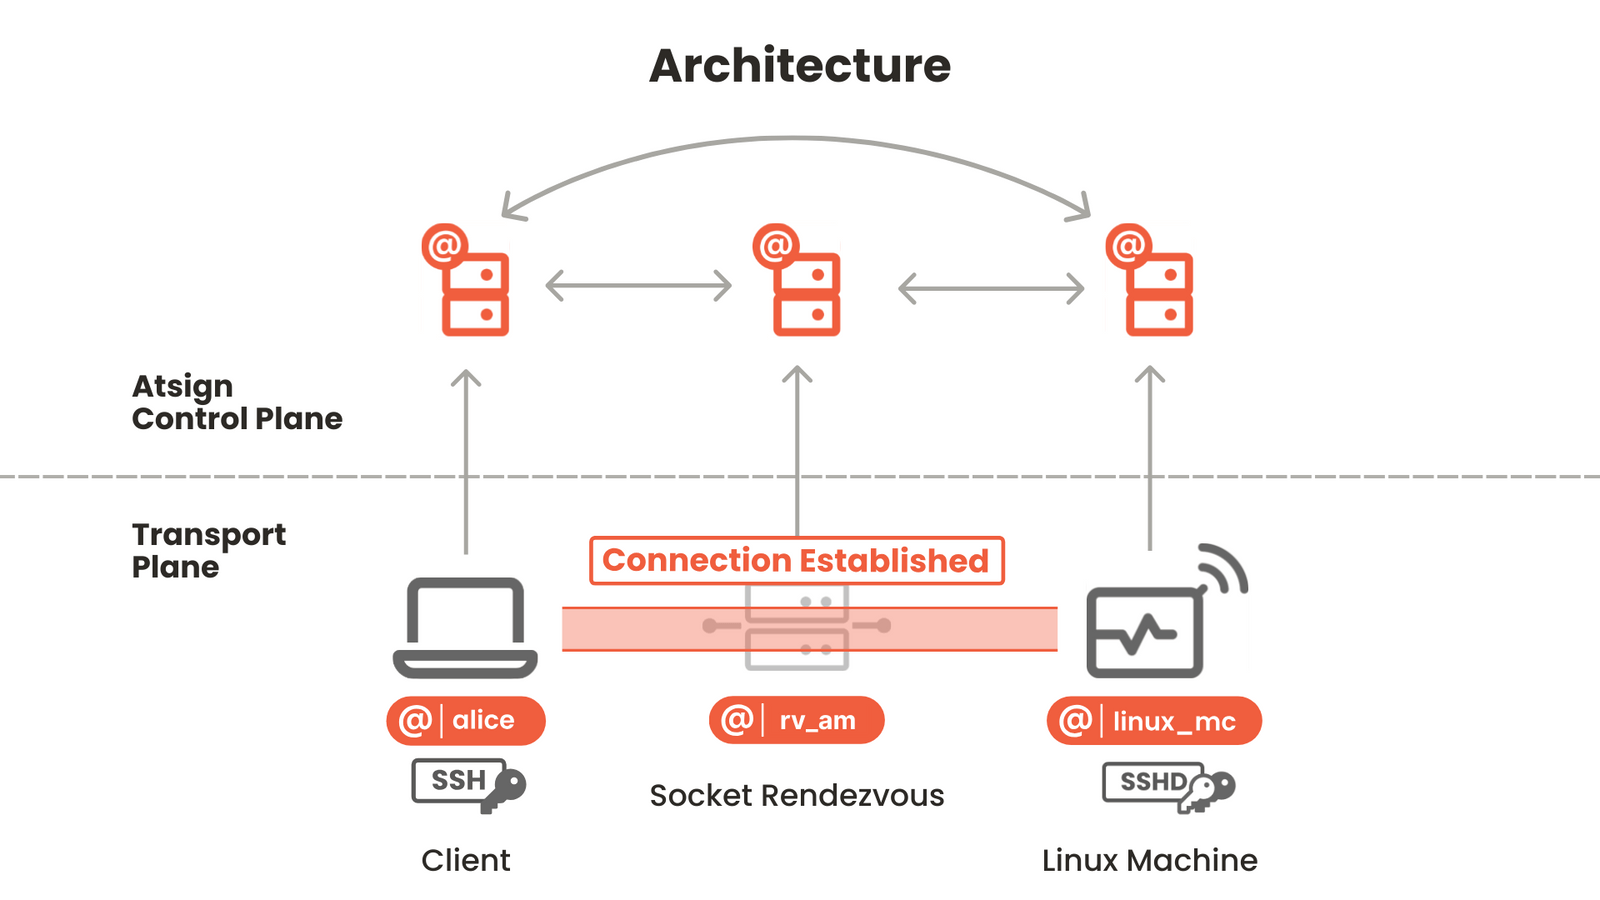
The main benefit is this SSH connection requires:
This allows users to remotely access equipment previously unreachable without requiring VPN tunnels or private cellular networks to handle the routing between devices.
https://atsign.com/technology/iot-internet-of-things/
https://docs.noports.com/ssh-no-ports/how-it-works
Atsign Usage
Atsign provides the sshnoports application for Linux and MacOS
https://docs.noports.com/ssh-no-ports/guides/installation-guide
Atsign offers users the ability to register a specific atsign ID as opposed to a randomly-generated one:
https://www.noports.com/#pricing
https://my.atsign.com/go
Their entire codebase is opensource on Github:
https://github.com/atsign-foundation/noports
It has very low system requirements (40MB of RAM and 50MB of flash storage), however the Linux builds are currently based on Dart with some very specific compilation options that aren’t compatible with ARM-based Digi routers. Atsign is working on a C-based implementation of sshnoports that will make the native installation available for all DAL OS devices in the future:
https://github.com/atsign-foundation/at_client_sdk
Atsign also provides a python-based implementation of sshnoports, which comes with a larger overhead for system requirements (namely storage, which increases to about 250MB of required space).
https://github.com/atsign-foundation/noports/tree/trunk/packages/python/sshnpd
https://github.com/atsign-foundation/at_python
sshnoports also requires access to the home directory of the filesystem, so it can setup SSH keys, atsign IDs, and start SSH services. To keep this application isolated from the base services on DAL OS devices, it is best to install and run Atsign’s sshnoports python implementation into a LXC container. Here’s a basic Ubuntu container tgz file with the proper user permissions, so you can install it directly on any ARM64-based device like the IX40. This can be utilized as a starting point for running many Linux-based applications inside a LXC container:
arm64_ubuntu.tgz
Here’s a reference of using this base container to setup the environment to run atsign sshnoports:
Note: Instead of running the below commands, Digi has pre-built a LXC container with the below steps already done. Jump down to the Prerequisites section
# lxc arm64_ubuntu -p /bin/bash -l

root@arm64_ubuntu:/# echo 'nameserver 192.168.2.1' > /etc/resolv.conf

root@arm64_ubuntu:/# chmod 644 /etc/resolv.conf

root@arm64_ubuntu:/# apt install openssh-server

root@arm64_ubuntu:/# apt install python3-pip

root@arm64_ubuntu:/# pip install atsdk

root@arm64_ubuntu:/# pip install sshnpd

root@arm64_ubuntu:/# wget https://github.com/atsign-foundation/noports/releases/download/v5.2.0/sshnp-linux-arm64.tgz

root@arm64_ubuntu:/# tar xzvf sshnp-linux-arm64.tgz

root@arm64_ubuntu:/# export HOME=/

root@arm64_ubuntu:/# ./sshnp/at_activate -a @atsign -c <cram>

root@arm64_ubuntu:/# /usr/sbin/sshd

root@arm64_ubuntu:/# usr/local/bin/sshnpd -a @device_atsign -m @remote_atsign -d device_name -u -v
Prerequisites
For this setup, the IX40 is the ideal product to run the python-based sshnoports application on, thanks to its expanded RAM and flash storage.
-
Get a DAL OS ARM64 device (such as the TX40 or IX40) running 23.9.20.63 or newer firmware. See instructions linked here for updating firmware on your Digi device.
-
The Digi router must have general Internet access in order to communicate with the Atsign registrar and rendezvous points.
-
Add the Digi device to Digi Remote Manager and ensure it has the Digi Containers subscription added to it
-
https://www.digi.com/resources/documentation/digidocs/90002349/default.htm#containers/subscriptions-cont.htm
-
Download the Atsign container from the following link. Warning: this is a 380MB file (includes python3 along with Atsign’s sshonoports python libraries), so have a good Internet connection to download it
-
atsign_lxc.tgz
-
Make sure you can access your Digi device via a local Ethernet connection, as you’ll need to transfer this LXC container onto it, so having a direct Ethernet will speed things up considerably
-
Setup your atsign account and register an atsign for each Digi router you wish to install the atsign container onto.
-
When creating the atsigns in your account, please ensure the atsign ID is named after the serial number of the Digi device. For example, if you are installing the serial number on a Digi router with serial number IX40060123292385, the atsign ID will be @IX40060123292385
-
Note: there is some future development to have Digi Remote Manager auto-register the Digi device with atsign, send the Digi device the appropriate cram key, that way the Digi device can start the atsign container, register itself with atsign, and start the sshnoports server all without the user having to manually setup their own account with atsign and copy/paste the cram key themselves.
Setup Instructions
The following instructions are to install a LXC container with the sshnoports client and server on an ARM64 Digi device running DAL OS, such as the IX40 or TX40. The device needs at least 100MB of memory and 1GB of disk storage available (to house both the container tarball and the persistent container once it’s running). For more details on the list of Digi DAL OS devices that supports Digi Containers and have enough memory to support running the atsign sshnoports python application, see the "Note on system resource limitations" section in the Digi Containers SDK article.
-
Access the shell console of the Digi device either by navigating to the Terminal page in the device's local web UI or by establishing a SSH connection to the Digi device. See Authentication groups for information about configuring authentication groups that include shell access.
-
Ensure your Digi device has at least 1GB of free space in the /opt/ directory. This can be found by running the show system verbose command from the Admin CLI or by running df -h from the shell console
-
Use SCP or WinSCP to transfer the LXC file onto your Digi device. Example:
-
scp atsign_lxc.tgz admin@192.168.2.1:/opt/lib/lxc/
-
From the Admin CLI of the Digi device, run the following command to create the LXC container config settings. Once the container is created, please remove the original tarball to free up filesystem space:
-
container create /opt/lib/lxc/atsign_lxc.tgz rm /opt/lib/lxc/atsign_lxc.tgz
-
From the Admin CLI or the System → Device Configuration page in the web UI, disable Clone host system libraries, enable Virtual Network on the LXC container, and assign it an IP address that it can use on the Digi device’s LAN network. Example for a standard-config IX40
-
> config
(config)> system container atsign_lxc dal false
(config)> system container atsign_lxc network "true"
(config)> system container atsign_lxc address "192.168.2.2/24"
(config)> system container atsign_lxc bridge "lan"
(config)> system container atsign_lxc gateway "192.168.2.1"
(config)> validate
(config)> save
-
From the shell console, run the following command to start the container in persistent mode and then start the sshnoports server in the container:
-
# lxc atsign_lxc -p /start.sh "$(runt get system.serial)" @remote_atsign [cram]
-
The @remote_atsign value in this command is the atsign ID for the secondary/remote device that will be running the sshnoports client to remotely connect to your Digi device. For more details on setting up a secondary, non-Digi device with sshnoports, see the following link:
-
https://docs.noports.com/ssh-no-ports/guides/installation-guide
-
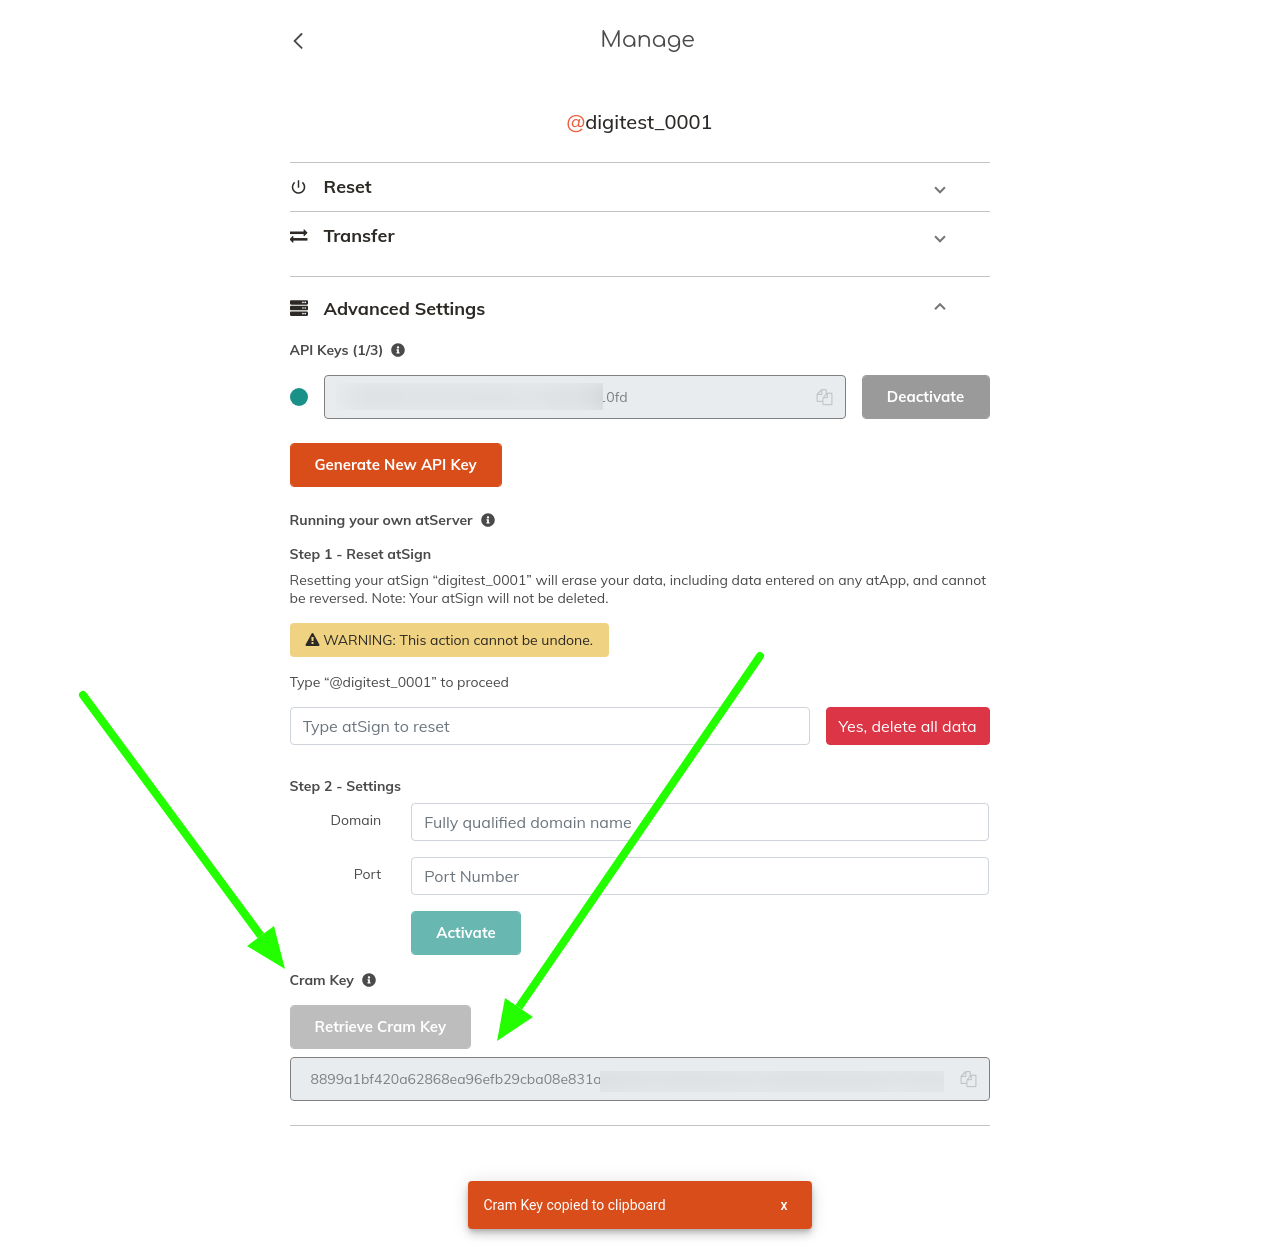
The [cram] value in this command should be the Cram Key that is utilized to activate the atsign ID on the Digi device. The atsign ID is based off of the device’s serial number, so lookup that atsign in your atsign dashboard, click Manage to edit the settings of that atsign, then click Retrieve Cram Key
-
-
Optional: If you want the sshnoports application to start-up automatically with the Digi router, in the Digi’s config settings enable the Start on Boot option and add the start.sh command along with the target remote atsign to the Optional parameters setting. Example:
system container atsign_lxc start_on_boot "true" system container atsign_lxc args "-p /start.sh @remote_atsign"
-
Once the sshnoports server is running, you can remote access the Digi router utilizing its serial number as the atsign. For example, if you had added the atsign container to an IX40 with serial number IX40060123292385 and setup my secondary device with an atsign of @digitest_0001, you could remotely access the atsign container on the Digi device with the following command:
./sshnp --from @digitest_0001 --to @IX40060123292385 -r @rv_am --device IX40060123292385 -u root --no-ad --no-et
-
the -r @rv_am option utilizes a rendezvous point to broker the initial connection between the two atsign devices. If you are running atsign on devices outside of the US, you can specify a different rendezvous service that atsign offers:
-
Americas (hosted in New York): -r @rv_am
-
Europe (hosted in Amsterdam): -r @rv_eu
-
Asia-Pacific (hosted in Singapore): -r @rv_ap
-
Below is some documentation on utilizing the sshnoports client
-
https://docs.noports.com/ssh-no-ports/guides/usage-guide/basic-usage
-
Optional: while the atsign container is running, if you would like locally access the container for an interactive session, which is helpful for troubleshooting the sshnoports application itself, you can do so by running the following command from the shell console of the IX40:
lxc-attach -n atsign_lxc -- /bin/bash -l
Deploying and running Atsign sshnoports through DigiRM
The following instructions can be followed for deploying and running Atsign sshnoports on multiple Digi devices en-masse utilizing the Configurations Template feature available through Digi Remote Manager.
Prerequisites
-
Must have a premier license/account in DigiRM
-
Must have the Containers service enabled in your DigiRM account. This is done by ordering the Digi Containers license (SKU name: DIGI-RM-PRM-CS). You will need to give them your customer ID for your DigiRM account and order a license for each device you would like to deploy the container(s) onto.
-
DAL OS device running firmware version 23.9.20.63 or newer
-
Add DAL OS device to DigiRM (see instructions in the device’s quick start guide) and assign the DIGI-RM-PRM-CS Digi Containers license to the device through the Management → Subscriptions page in Digi Remote Manager 
Walkthrough
-
Create a Configurations template for your device
-
Go to the Configuration page in DigiRM. Click Create
-
Give the new template whatever name and description you want. Select the group, device type, and firmware version for the DAL device you setup in the prerequisites above. Ensure any additional devices you want to deploy the sshnoports application onto are in the same group and device type in Digi Remote Manager. Click Continue
-
In the Settings step, click Import from device and select the DAL device you setup in the prerequisites above. Click Save once the settings are imported
-
In the Containers tab for the configurations template, add the container to the configuration template
-
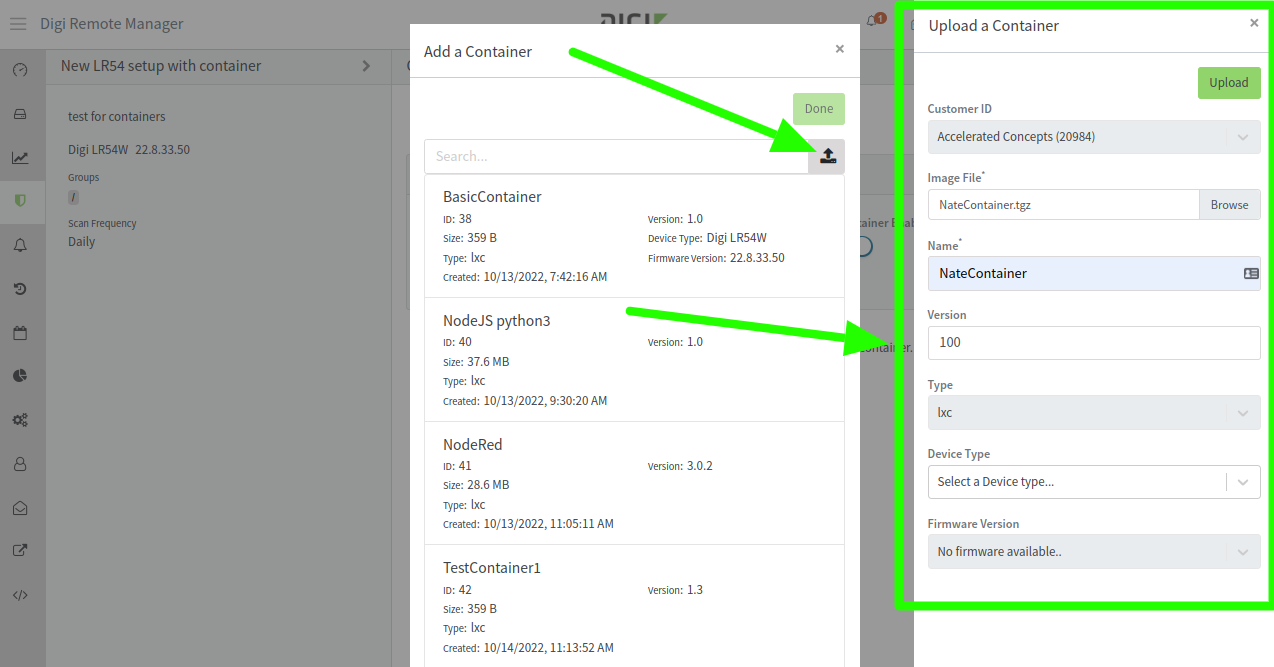
Click the + icon and then click the upload icon in the pop-up window to add a new container
-
Upload the Atsign container file you had downloaded in the steps above. Set the Name of the container to the same name as the container .tgz file. This is absolutely necessary, otherwise the container config settings and file won’t get setup on the DAL device properly. Below is an example with a container named NateContainer.tgz
-
Click Save
-
Click Continue to go through the rest of the Configuration template setup. Under the Automation step, ensure you enable the Enable Scanning and Remediate options so DigiRM will scan the target DAL device and remediate it to match the configuration, container, and firmware settings specified in the configurations template
-
Initiate a config scan/remediation to apply the container and config settings to the DAL devices
-
You can always wait for DigiRM to automatically scan/remediate the device, but if you want to test out the container sooner:
-
Look at the Configuration Scan History tab on the device’s details page in DigiRM to verify the configuration scan and remediation occurred.
-
Verify the sshnoports application is running as expected in the container by utilizing a second atsign device to remotely access the container in the Digi device as described previously
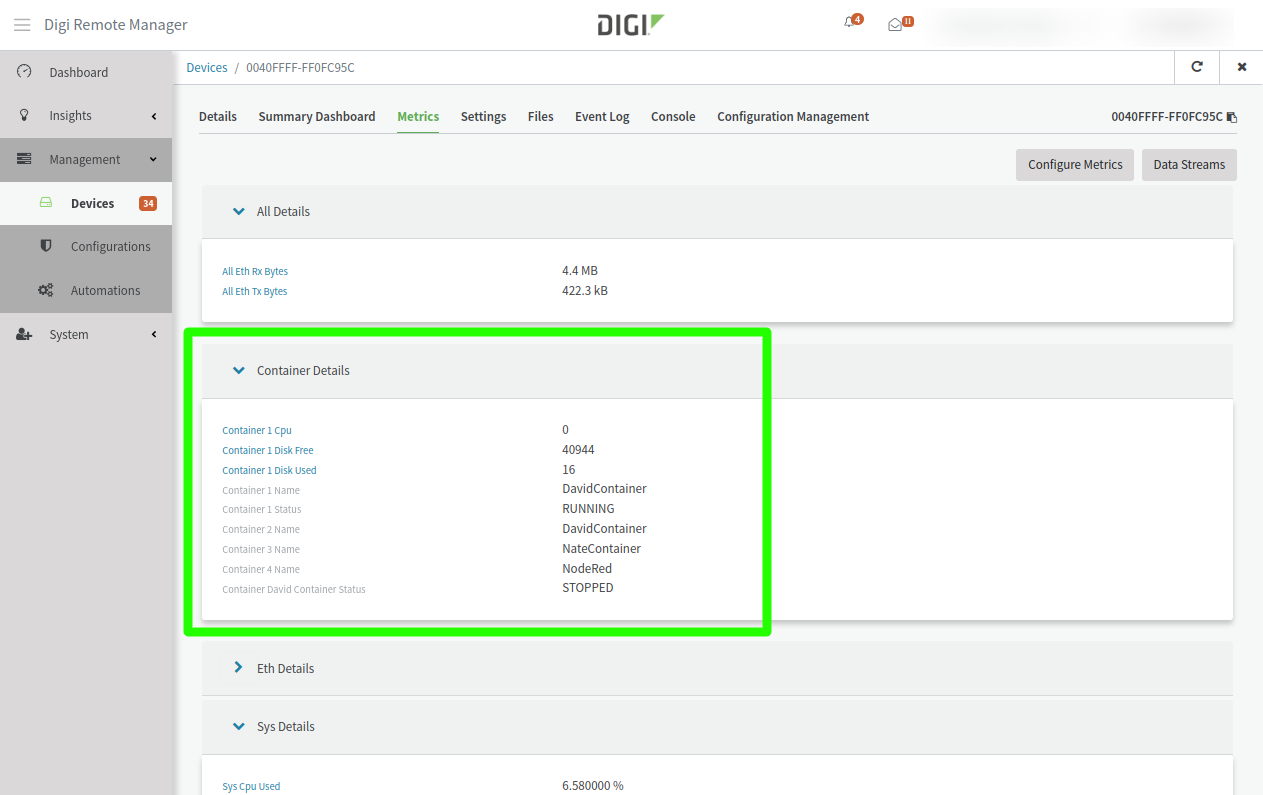
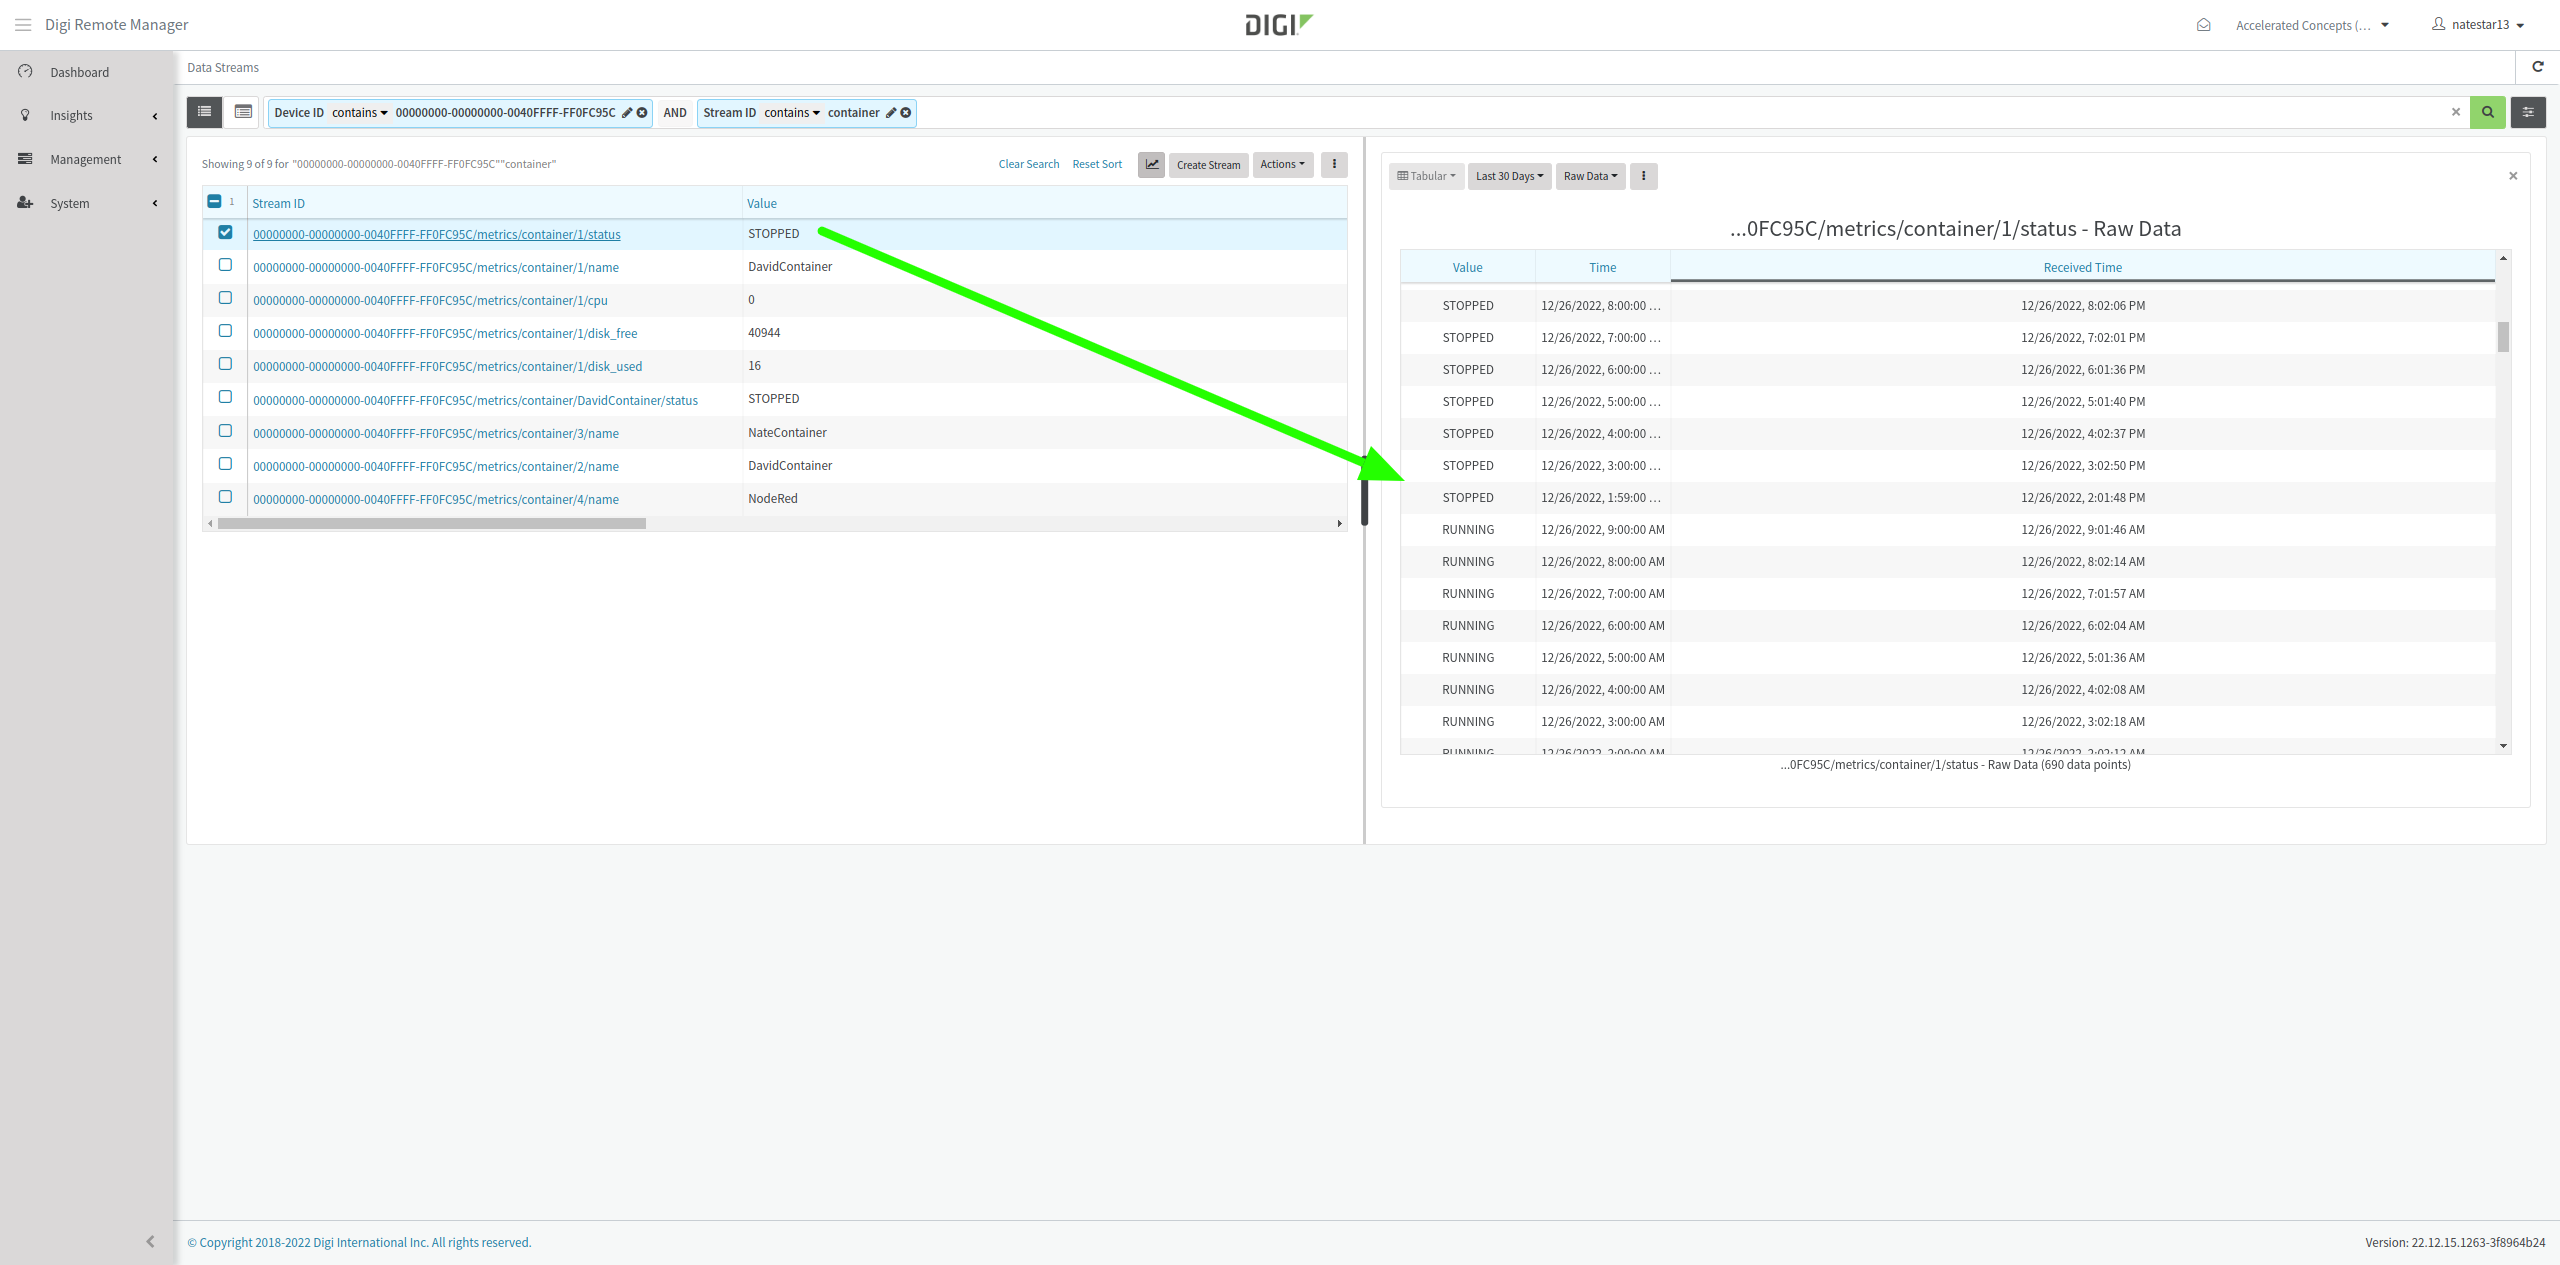
Monitoring the status of your containers
The status and runtime state of each configured container on the device is tracked in Digi Remote Manager as datastream metrics. These metrics can be viewed under the Metrics tab for the device in DigiRM, or under the Data Streams page. On the Data Streams page, each datastream metric can be clicked on to view a history of changes. See example screenshots below:
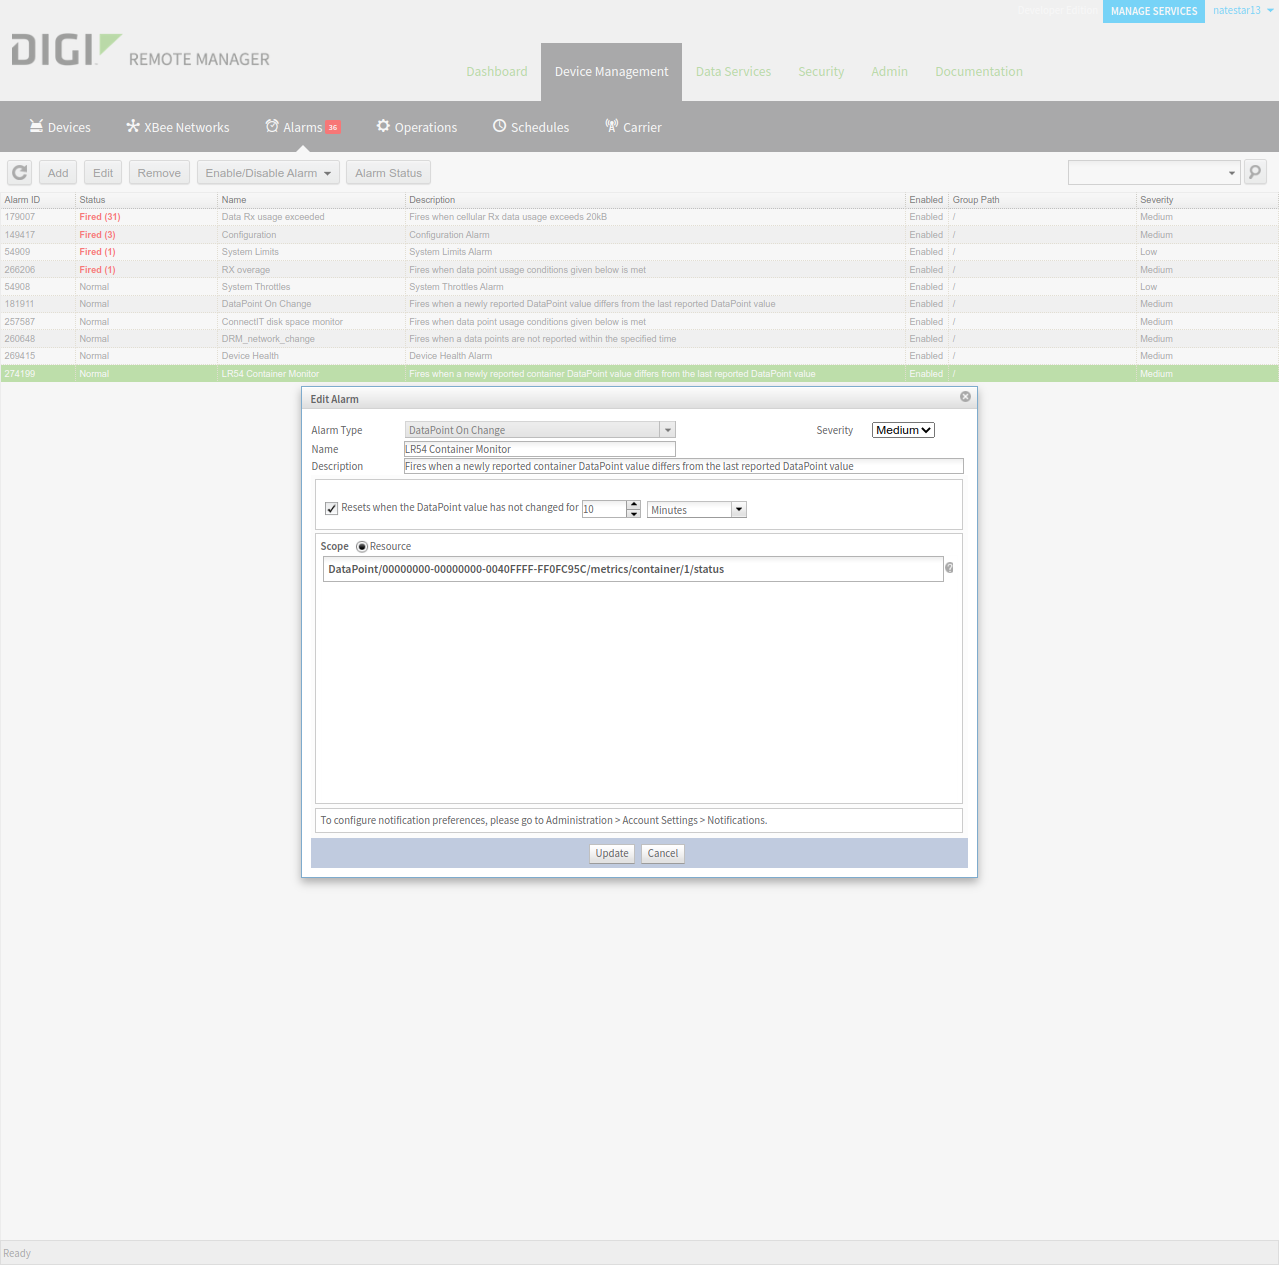
Alerting on changes in container status
Any of the above datastream metrics listed for the container can be monitored and alerted if the state changes or if it changes by a configured amount for a period of time. For more details on setting up alerts in Digi Remote Manager, see this link to the user guide. Below is an example alert definition that would generate an email notification from DigiRM to your user’s email if the container’s status changed (i.e. from running to stopped, or vice-versa).
Last updated:
Oct 07, 2025